V-Ray 5 Review : Beyond Rendering

V-Ray 5

A key theme in the V-Ray 5 release is simplicity, it feels easier to use and there are time-saving things that over the years you have just come to accept as a tough but essential part of using a render engine. I think we can thank Corona render engine for that. You can definitely notice the Corona, V-Ray collaboration and the sharing of tools, which is of massive benefit to both Corona and V-Ray users.

V-Ray 5 comes with a brand new, completely rebuilt frame buffer that is a joy to work with. Light Mix and Layer Compositing are the heroes in this release but there is plenty more cool stuff in this release so lets get to it.

Light Mix

Those that have used Corona render engine will be familiar with Light Mix. For many it was a driving force to add Corona to their tool set. Light Mix lets you create tons of lighting scenarios from a single render. You render your scene once and don’t really have to think too hard about the lighting before you hit render. Just place your lights and tweak them after you have rendered.

You can also create some nice light animations from one render. Imagine the time it would take to render all of the frames below individually.

ContactSheet-001.jpg

From a single render, you can create very different moods using the light colors, change a scene from day to night and turn on and off certain lights.

Light Mix Gif.gif

To set up light mix

  1. Add a light mix render element,

  2. Render your scene.

  3. Play with your lights in the frame buffer. (go to source and select light mix)

    Remember the light values are multipliers or the original light value.

V-Ray Frame Buffer

  1. A small but powerful addition to the frame buffer is the ability to search in the history panel.

  2. You’ll notice pixel information is down on the bottom panel rather than having to right click.

  3. And when you zoom you will notice a red border, which suggests you are not seeing the whole image. Again not massive, but it shows the thought that has gone into this release. 

  4. Render region is now much more intuitive to use, with the ability to move and resize regions.

Frame Buffer.png

Filmic Tonemaps

Filmic tonemaps have been added as a layer and are wonderful! V-Ray 5 comes with Filmic tonemaps built in and some of these have the option to edit them further. These tone maps are definitely going to get a lot of use going forward. AMPAS looks great out the box and then Power Curve has tons of options we can play with.

FilmicTM.gif

Material Manager

I find the 3ds Max way of handling material libraries tough and loved what Corona did with theirs. V-Ray has done something similar and with the addition of being able to save and organise your own materials coming in the next hotfix this is shaping up to be a great material manager.

Material Manager.png

Something else that you will notice is the material previews have been greatly improved with an updated light setup. These material previews are much closer to what we will see in the final render.

Material Presets

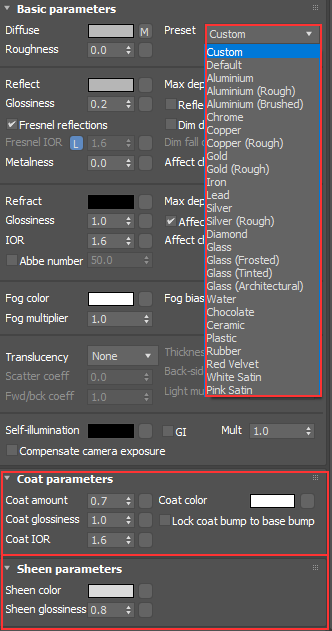
V-Ray ships with over 500 ready made materials, these will give you a massive head start in your material creation. The V-Ray materials also have the addition of presets. So for any of you fed-up of having to search for the index of refraction of a material, this is a great addition. The new coat layer option in the V-Ray material does away with needing to add a blend layer to get a varnished finish on your materials and the sheen option aids with the creation of falloffs for fabrics.

Vray Mat.png

Textures

VrayUVRandomizer has been added. When plugged into a Vray Bitmap we can control multiple UVs, another example of improving things you had come to accept.

Multi UV.png


There is also an option in here for Stochastic tiling. Even if your texture is seamless you may get repeats and with this turned on we can see it randomizes the tiling.

Stocastic Tiling.gif


VrayMultisubtex is a new addition as well. Anyone familiar with CG Sources MultiTexture will understand the power of this map. You can have random by element on and change the hue, saturation and gamma to quickly get a decent amount of variation from just a few textures.

MultiSub.png

I would love a way to drag and drop textures in as Vray Bitmaps rather than the default bitmaps. Also worth noting is that the VrayHDRI map is now VRayBitmap and you can plug your HDR images in here. 

Conclusion

This is one of the first render engine releases I have been excited about for more than the promise of speed improvements. We have been given a fantastic tool set where the pendulum has shifted from technical knowledge to creative flexibility. We are artists that want to create art and Chaos Group have offered us the ultimate Swiss army knife. 

Get a 30 day trial here - https://www.chaosgroup.com/trial/vray-3ds-max

Full Video Review

Get my BEST updates delivered to your inbox. Join my email list and get my favorite content regularly. Unsubscribe anytime.


I hope you have enjoyed the article. If you have any suggestions for new articles please vote here

Render On!

Render On Jake.jpg

Product Rendering: 3 Reasons Why Its Time To Use CGI For Your Product Images

CGI stands for Computer Generated Imagery. It is the creation of visual content using computer software. Technological advancements mean it is possible to create images that are indistinguishable from photographs. CGI is virtual photography and used more than ever, the last advert you saw is most likely created using CGI. The benefits are cost, time, and quality.


CGI is not only reserved for blockbuster movies. Did you know that 75% of the Ikea catalog is CGI? Furniture manufactures and online sellers realise the importance of product images. It is the first thing customers look at and will be one of the most important factors in the product’s success.

Which one of these would you buy?

Image Credit: sumo.com

Image Credit: sumo.com

Take a look at your competitors and even your site. I imagine most images are photographs on a white background. Having clean product images with no distractions is important. Your website is where your customers are most likely to buy. The best way to showcase your product is with these crisp images.


Cost

Transporting products and staff costs money and can be a logistical nightmare. As well as renting a photography studio, equipment, and a photographer. Products that come in different materials and configurations add to the shipping costs. Not only a monetary cost, but shipping products has an environmental impact. This environmental impact is avoided with CGI.

CGI gives the opportunity to see and sell the product before it even goes into production. Seeing the product pre-production saves much wasted time and resources. With CGI the only cost is the CGI itself.


Time

If you need different variations of a product then photography would seem archaic compared to the speed of CGI. Time, traveling and shipping products to the shoot on top of the time it takes to do the actual photoshoot soon snowballs. CGI is faster than doing a traditional photoshoot because there is no need for a photoshoot at all.

There is also no room for error with a traditional photoshoot as you only get one chance to do the shoot. With CGI it is possible to make changes all the way up to the publication of the images. CGI lets you alter product images without needing to reshoot.

Once the CGI version of the product has been made it can be used over and over for future product images. And finally, with CGI, marketing material can be distributed before the product even exists.


Quality 

With CGI materials can easily be exaggerated to show off a β€˜better than real-life’ quality. No need for retouching photos after the shoot.

DenhamIO_GIF.gif

If you have ever tried to line up photos to flick from material to material you will know it is almost impossible. Above you will see the smooth transition between images when using CGI. With CGI you get exactly the same image in different variations.

Conclusion 

From being around traditional photoshoots I am a massive advocate of CGI. I honestly believe that CGI is a more cost-effective and smarter way to work. 

I hope I have helped to highlight some of the key reasons why I believe you should be investigating CGI for your product images. β€‹β€‹β€‹β€‹β€‹β€‹β€‹

If you have would like to talk about getting your product images created, send me a message on denham.io


Rendering CGI Interiors: 5 Interior Tips To Create Your Best Visuals Ever

Quick Summary

Here is a quick summary of what my blog post will cover so you can decide if this article is for you.

These are the tips in no particular order.

  1. Speed up your workflow with scripts. Let the robots do the work.

  2. Use fur to soften up your scenes. Use organic objects to add realism to your CGI.

  3. Soften your edges, easily. How to use maps rather than chamfer.

  4. Depth of Field. Add realism to your shots with DOF.

  5. The future of rendering. Fast, efficient and cost-effective. This changed everything for me.

Do you want step-by-step instructions to implement all these tips?

Alright, let's get going.

The Tools

The tips I am going to show you are from the Interior Visualisation with 3ds Max and V-Ray course, but don't worry about that just yet, check out the tips and see if you like them, because if you don't like them then the course definitely won't be for you ..

These are a few of the things I personally do to speed up my workflow and deliver high-quality images to my clients.

After you're done reading and watching, you'll have new techniques to use when creating 3D renders. My objective is to provide you with techniques so that you can start replicating the results in your own images for your own clients.

Top 5 Image 1.jpg


The tips I am going to share are going to save you buckets of time in the long run and improve your rendering, so invest in yourself now and learn these techniques. I'll now go into details of my favorite tips using 3ds Max + V-Ray and show you how you can do the same in your own 3D renderings.

But first, if you have not got 3ds Max and V-Ray installed you can find trial versions here (3ds Max + V-Ray) You don’t have to use these tools specifically. Have a read and apply whats good and ditch what's not.


1. Make Quick Scripts

Scripting, coding, whatever you call it is reserved for developers, not artists, right?

Wrong, one of the best things I have done in my work is to see what scripts are all about.

The best artists in the world recommend them. 20 Top Tips From The World’s Best 3D Artists.

Have you ever thought, I do this task over and over again, there must be a quicker way? Well, you’re right there is.

I made a copy and paste script and I worked out it made me about 83% quicker in that specific task.

My Maths

My Maths

You can download the script from the resources of the course, but you should create it yourself so you know what your doing, β€˜give a man a fish, give a man a fishing rod…’

So here is how I did it…

Open MAXScript Listener from the Main Toolbar. Scripting > MAXScript Listener

This is going to open up the Max Script Listener window.

Max Script.jpg

In here you will see MacroRecorder, click this and Enable

I think this is one of the coolest things in 3ds Max, it basically shows you what’s going on behind the scenes.

Go ahead and create a box one and watch what happens in the Listener. If you want to create a box in the future then you can just copy and paste this script.

I know you know how to make a box using Create > Standard Primitives > Box and click and drag. But if you think about that, you’ve done 3-4 clicks.

If you make a button for your script it will be 1 click. Making this action 3-4 times quicker next time. Compound this and the effects are massive.

Obviously this is a very basic example, but some good uses for small scale scripts are

  • Add a 100cm x 100cm, Box, UVW map. (5 clicks become 1)

  • Reset X-Form and ground pivot points. (6 clicks become 1)

  • Add a Real-World UVW box map + Chamfer (5 clicks become 1)

  • Create a new basic material and apply to the selected object (7 clicks become 1)

As a general rule, if you find you have done a task 5 or more times in your life it’s time to consider if you should make a script for that action.

Here is a video showing how to make the copy and paste script.


2. Use Vray Fur

3D is made up of polygons, basically squares. Squares have straight edges, which means in previous years it was tough to make β€˜organic’ objects. Things such as plants, fabric and soft, curvy things were hard to make look realistic because of poly count restrictions.

Check out the poly counts from Crash Bandicoot on the Playstation 1

Check out the poly counts from Crash Bandicoot on the Playstation 1

Compare the Playstation version of Crash Bandicoot to what Epic just tech demoed in Unreal.

All the polys

All the polys

Now we are practically unrestrained by poly counts there is no reason not to be β€˜softening’ up your scenes with organic objects.

I would suggest

  • Flowers and plants

  • Fabrics, cushions, and throws

  • Fur and hair.

Fur, in particular, is something people are not so used to seeing in CGI so you can expect to hear more β€˜what that’s not a photo?’ 

Here’s a quick video showing how easy it is to start creating awesome fur.


ο»Ώ

3. Soften Edges With Maps

Talking of softening edges, chamfer has always been the go-to when trying to soften up those hard CG edges 

Chamfer.png

Especially with Autodesk’s work over recent versions of 3ds Max on the Chamfer modifier. Which, with all jokes aside is so much better to use than within the editable poly. The modifier allows us to stack the Chamfer to update later on, rather than β€˜baking’ it into the editable poly.

But…

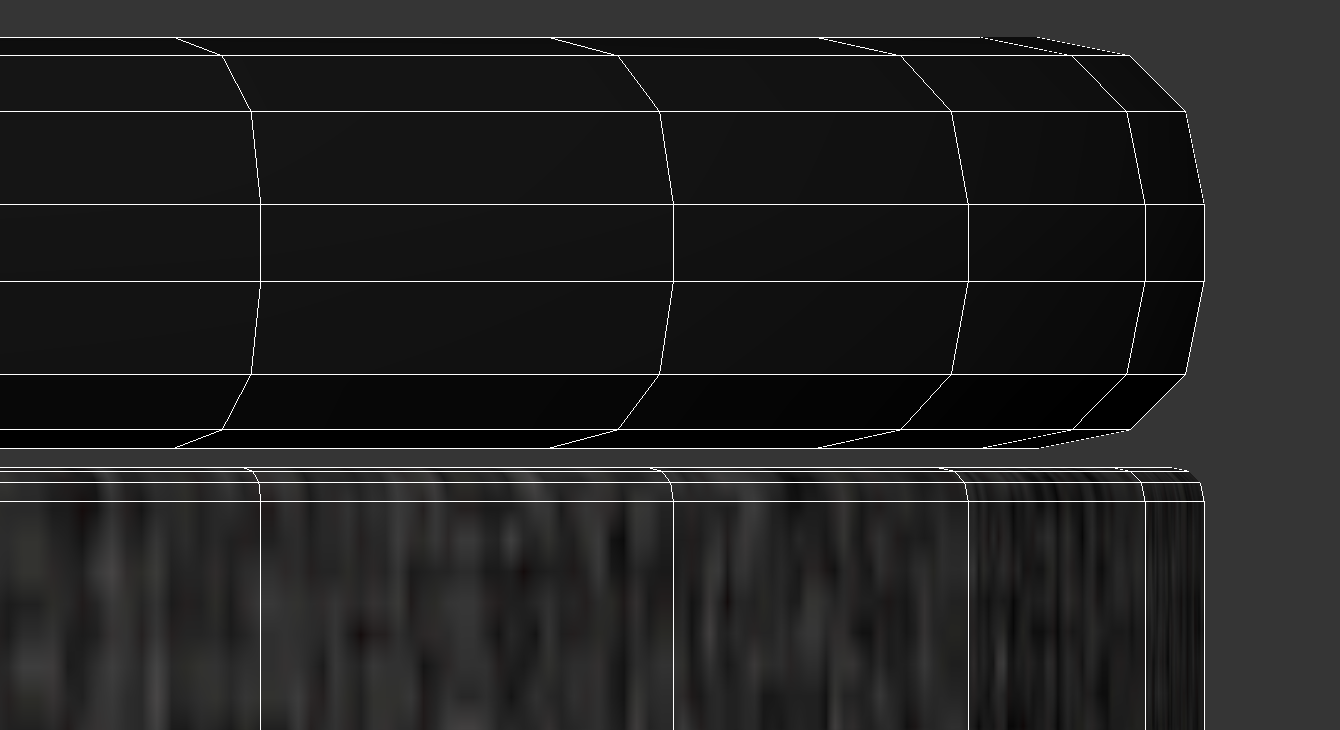
There is an easier way. And that way is by using the Vray Edge Tex map. You can plug this map into the bump slot and it will β€˜chamfer’ your edges. You can keep your current bump map as well by using a Vray Comp Texture.

Check out the video below on how to use the Vray Edge Tex Map to create soft edges.


4. Depth Of Field

Depth Of Field (DOF) can add so much to an image, I particularly like using depth of field on detail shots like below. 

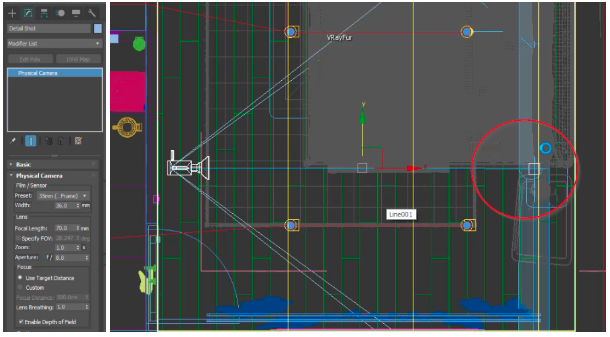
This is achieved pretty quickly by enabling Depth Of Field in the Physical camera and turning on Use Target Distance. Then all you need to do is place your camera target to where you’d like your image to be in focus. 

3ds Max Physical Camera and Camera Target in Viewport

3ds Max Physical Camera and Camera Target in Viewport

Here is a video of how I achieved the depth of field in the image above.


5. V-Ray Cloud

This changed everything for me. Since I went freelance and started traveling with my laptop render power has always been an issue for me. I have tried many render farms, but V-Ray Cloud is my new favorite.

I have found the upload speeds are second to none, I think this is because they use a VRScene file to upload it. I don’t know too much about the technical stuff involved here, what I do know is it works.

Here is how to install V-Ray Cloud and how to submit a render.


Your Next Steps ..

I hope you enjoyed this article and learned a thing or two .. :-)

If you feel like upgrading your β€œskills” you can check out the full V-Ray Interior Course.

If not, I hope you have enjoyed the article. If you have any suggestions for new articles, please put them in the comments below.

Render On!

Render On Jake.jpg

ο»Ώ

3ds Max and Corona Renderer: 5 Tips To Create Your Best Visual Ever

Quick Summary


Here is a quick summary of what my blog post will cover so you can decide if this article is for you.

  1. Corona Scene Converter. Looking for the quickest way to convert a V-Ray Scene to Corona? Here's how.

  2. Corona Light Mixer. One of the most exciting thing about Corona Render Engine. Plus a bonus tip on how I created and animation for a client in no time.

  3. Corona Material Library. How to use and manipulate the built in material library.

  4. Round Edges. Can't be bothered to chamfer all of your objects. Me neither, here's a quick way to do that.

  5. Post Production. Photoshop is awesome, but what if you could do all you're post in the Corona Frame Buffer?


Do you want step-by-step instructions to implement all these tips?

Alright, let's get going. 

Corona Renderer

The tips I am going to show you are from the Interior Visualisation with 3ds Max and Corona course but don't worry about that just yet, check out the tips and see if you like them, because if you don't like them then the course definitely won't be for you ..

These are a few of the things I personally do to speed up my workflow and deliver high quality images to my clients.

After you're done reading and watching, you'll have new techniques to use when creating 3D renders. My objective is to provide you with techniques so that you can start replicating the results in your own images for your own clients.

I have had the opportunity to review Corona Renderer a couple of times as part of the 3D Artist magazine Expert Panel.

I have had the opportunity to review Corona Renderer a couple of times as part of the 3D Artist magazine Expert Panel.

The tips I am going to share are going to save you buckets of time in the long run, so invest in yourself now and learn these techniques. I'll now go into details of my favourite Corona Renderer tips and show you how you can do the same in your own 3D renderings.

But first if you have not got the 45 day Corona trail installed then head here download and install the latest version.

Click the button below to download the guide.

Click the button below to download the guide.

1. Corona Scene Converter

Do you know the best thing about using Corona for the first time?

We can use our previously created scenes and convert them to Corona and they will work a treat!

Once you have corona installed you can convert V-ray scenes with the click of a button!

This is how I do it ..

Once you have installed Corona open up 3ds max.

You should see the Corona Toolbar, if not right click on a Toolbar and click on Corona Official Toolbar.

On the Corona Toolbar, click Run Corona Converter and in the window that pops up click Start Conversion.

Here is a video to explain.

2. Corona Light Mixer


But what  if we want to make adjustments to the lighting on the fly?

I am glad you asked.

This is one of the most exciting things about Corona Renderer.

It used to be that, using a certain amount of guess work you would set up lights.
Hit render. Pray a little.
Stop the render and adjust the lights,
Hit render, pray ...
and repeat until you had a pretty good result.

prey.gif

This took a lot of praying and was also quite time consuming.

Now all you need to do is hit the Set Up Corona Light Mix button… 

Corona light mix works by rendering out each light separately. 

This means that even whilst the image is rendering we can change the intensity of the lights and even the colour.

This is how I do it ..

Start by downloading the Step By Step Guide and watching the video ..

Bonus Tip - You can animate lights!

Whilst doing a client project I was asked to produce an animation where the lights would turn on one by one. 

In another render engine I would most properly need to render each image out one by one. In this case that would have been 11 images that would need rendering individually.

ContactSheet-001.jpg

But lucky with Corona Light Mixer all i needed to do was turn off all the lights and then turn them on one by one and save out the images. I then put them together in a video editor.

Here is the result…

3. Corona Material Library

Nice work, still with me?

We have set up our lighting and it looks pretty cool but what if we want to change materials? 

Well you’re in luck. Rather than starting each material from scratch, Corona has a built in material library of all the materials you could wish for. 

You can use these as is or use them as a base and update them with your own textures.


4. Round Edges

Straight edges are a dead give away that an image is computer generated. 

β€œI want my materials to have round edges” I hear you cry.

Well you could chamfer all of your objects... but that would take ages.

Well how about you use the Rounded Edges material in Corona?

The quickest way to avoid straight edges is adding the rounded edges material to the bump map slot of your material.

Here's how…

5. Post Production

Nice, so our image is looking great, so then we render it. 

We could take these images into Photoshop and do the post like this…


Or we could do all the post production in the Corona Frame Buffer!

Like this…


Your Next Steps ..


I hope you enjoyed this article and learned a thing or two .. :-)

Are you a 3D Artist?

If yes .. Do you have a system to deliver top notch results everyday..?

This is what clients are looking for ..

Consistency ..

If you feel like upgrading your β€œgame” ..

You can check out the full Corona Interior Course here.

And make sure to get all my free resources below and implement the tips to speed up your workflow!

Download 2.jpg

Click the button below to download the guide.

Render on!

vlcsnap-2018-04-05-05h48m25s195.jpg

3ds Max + Vray Exterior Visualisation: 5 Tips To Create Your Best Exterior Visual Ever

Quick Summary


Here is a quick summary of my blog post so you can decide if this article is for you.
 

These are the tips in no particular order ..
(you can click on the number to jump to a specific tip, welcome to the future πŸ˜‰ )
 

1.  Straighten the vertical lines. Architectural photographers do it so we should do it too. After all we are virtual architectural photographers.
  

2. Use HDRI Lights. This is how I start lighting every scene I create. Once you have this light rig set up you can save it and use it to start all your scenes.
 

3. Sweet so you have your light set up, but what angle should you have it? Here I explain a quick way to test out your HDRI angles. (this tip even made it into 3D Artist Magazine!)


4. Fog is cool in any exterior image but can be a pain to set up in 3ds Max. So here I show you a real quick hack to create fog in Photoshop.


5. Ready to add grass and bushes, but don't fancy placing each blade of grass one by one :/ Here's how to 'paint grass and plants' using only 3ds Max.


Do you want step-by-step instructions to implement all these tips?


Alright, let's get going. 


Exterior Visualisation


The tips I am going to show you are from the exterior visualisation course but don't worry about that just yet, check out the tips and see if you like them and can use them, because if you don't like them then the course definitely won't be for you ..

These are a few of the things I personally do to speed up my workflow and deliver high quality images to my clients.

Notice that some of the tips here can be used in interior visualisation as well. For example tips 1, 2 and 3.

After you're done reading and watching, you'll have new techniques to use when creating 3D renders. My objective is provide you with techniques that you can start replicating the results in your own images for your own clients.

3.jpg

Do you know what's cool about all of the techniques I am about to show you ..?

Once you learn them, you can use them over and over again. Things like the HDRI tips (2 and 3) can be set up, saved and opened for every scene.

This is going to save you buckets of time in the long run, so invest in yourself now and learn these techniques. I'll now go into details of my favourite exterior tips and show you how you can do the same in your own 3D renderings.

Click the button below to download the guide.

Click the button below to download the guide.

1. Straighten Your Verticals
 

Do you know the best thing about being a Photographer in the Virtual world ..?

We can bend reality. Literally. 

Check out these two images.

example.jpg
example2.jpg

When we have something like the top image it can look a little odd. That's because in reality we view everything as straight, honestly check it out now. Our eyes have auto tilt turned on all the time! 

Imagine doing this as a Real Photographer .. you would have to buy a tilt shift lens. (one of those will cost you upwards of Β£1000) 

Lucky for us we are Virtual Photographers πŸ˜ƒ


This is how I do it ..


Vray Physical Camera

Create a Vray Camera anywhere in the viewport. 

If you want the camera to be where you are viewing from you can just hit Ctrl+C.
 
Hit C on the keyboard to view through the camera.

Now select your camera. You can do this by clicking on the camera name in the top left of the viewport.  Select Camera from the dropdown. 

Under the Basic Parameters in the modifier panel you can then adjust the vertical tilt.

Easy hey, well it gets easier. How about clicking on auto guess vert tilt.

Vray Camera.gif


Corona Camera

Follow the same instructions as above to create and select your camera but this time in the modifier panel Tick the box next to Automatic vertical tilt.

What, so easy!

Corona Camera.gif


Physical Camera

And finally the trusty 3ds Max standard camera. Again, use the same steps to get to the modifier panel but this time take a look under Perspective Control, there's an Auto Vertical Tilt Correction button here too.

Physical Camera.gif


Photoshop

I usually straighten verts in 3ds Max for reasons you will soon find out. 

But if you have already rendered your image you can also do this in Photoshop.

The easiest way is to go to Filter > Lens Correction. Under Transform, move the Vertical Perspective controller.

The problem with using this technique is you are going to lose some of your image.

Photoshop.gif

2. Use High Dynamic Range Images to Light your Scenes


This is it, the secret sauce πŸ˜ƒ How to achieve highly realistic renders. And this is how I light nearly every scene. First I am going to explain what a HDRI is, then I will walk you through how to set it up.


Want to know another secret ..?


Once you have set this up, you can save it as Exterior_Lighting.max and use it for lighting in your future projects. All you have to do is swap out the HDR image.


There you go, we have eliminated one of the most time consuming tasks already!


2.1 What is a HDRI?


HDRI is short for High Dynamic Range Image... 

They are panoramic images that are shot at different exposures and then combined into one 32-bit image. 

But all you really need to know is they can be used in 3D programs as a light source. They create very natural and realistic lighting effects. 

whats a hdr.gif

2.2 So how do I set up a HDRI in my scene?


Great question, I am glad you asked!


This is how I do it ..


Start by downloading the Step By Step Guide and watching the video below ..

3. Get The Light Right


Nice work, still with me? Cool.


So we have set up our lighting and it looks pretty cool but what if I want to change the direction of the sun? Well don't worry, I've got you covered :-)


This tip got me a full page in 3D Artist magazine!

3D Artist – Issue 98 2016_Page_080.jpg

Alright, so most people would hit Lock to Icon in the light settings, rotate it a little then hit render, wait, look at it, rotate it again, hit render... not us though. 


We are going to keyframe, which means animate the light to rotate every 10-25 degrees, hit render once and make a coffee..


Got that coffee? Here is your render..


HDR Ani.gif


This is how I do it ..
 

You can download all the guides at once by clicking below.


When I first started out with 3D I was doing all this stuff manually over and over. 

But when you start working for design studios you soon realise that you haven't got time to start from scratch every time.

So make sure you start creating systems of everything you do more than once. 

The name of the game is to eliminate repetitive tasks and focus on creating remarkable images.

4. Atmosphere


Now this image is looking pretty good..

But there is something missing ..

FOG

Like straightening the verticals this can be done in both 3ds Max and Photoshop. Personally I prefer doing it in Photoshop. I feel like I have more control and it takes less render time. 

If you do want to do it in 3ds Max you can hit 8 on the keyboard to open the Environment Settings. Add fog and active it. 


Fog settings.gif


But if you want to do it like me ..
 

Pretty cool, huh?

5. Paint with Plants
 

But what exterior image is complete with out plants, trees, grass, leaves, rocks..

I have saved the best for last. As I mentioned earlier it's all about saving time to allow you to be more creative.

This one is going to save you tons of time.

We are going to use pre-made models of grass in this example.
We create a ground plane and then use a brush to 'paint' grass randomly over the surface.
 

Let me explain..


Your Next Steps ..
 

I hope you enjoyed this article and learned a thing or two .. :-)

Are you a 3D Artist?

If yes .. Do you have a system to deliver top notch results everyday..?

This is what clients are looking for ..

Consistency ..

If you feel like uping your β€œgame” ..

You can check out the full Vray Exterior Course here.

Make sure to get all my free resources below and implement the tips to speed up your workflow!

Click the button below to download the guide.

Click the button below to download the guide.

Render on!

vlcsnap-2018-04-05-05h48m25s195.jpg

10 Need-To-Know Tips And Tools For 3D Freelancers

10 Need-To-Know Tips And Tools For 3D Freelancers

Freelancing, it can be a tough game. A few years ago I quit my job working for a yacht designer in Monaco to become a freelancer. It was quite a leap, it was scary but the pros now far outweigh any cons. I love the freedom it has given me, I no longer have to ask permission to go on holiday, I get to spend far more time with my family and I have the opportunity to work on a variety of awesome projects of my choosing. However, when I did take the leap, it wasn’t quite as easy as I’d first thought and I think I would have appreciated some hints and tips before I started. So, in the interest of knowledge sharing, here are a few things I have learnt along the way.

How and Why to Use 32 Bit in 3D Renders - 32 bit workflow Photoshop tutorial

How and Why to Use 32 Bit in 3D Renders - 32 bit workflow Photoshop tutorial

I meet Jonnas on the island of Koh Phangan, whilst I was recording the Interior Visualisation course. Recently we have been collaborating on some exciting VR projects. Joonas said I should be using 32 bit. Many people had said this before, and when Joonas said it as well I knew it was finally time to work it out how and why? The big file sizes and the limited post production tools had made me resist until now.

20 Top Tips From The World’s Best 3D Artists

With 3D being an ever-changing landscape it can be difficult to know where to start.

I have been working in the industry for 10 years now and during that time I have been lucky enough to claim as friends and mentors some of the most talented 3D artists in the world.

Through this post I wanted to share some of their knowledge and wisdom with you, so if you are starting out in 3D, or simply have an interest in the subject, read on for 20 Top Tips from the cream of the crop.

I asked two questions:

1. What do you wish you knew when you started 3D?
2. What top tip can you share with us?


Here's what they said:


Ismail Rebbane

What do you wish you knew when you started 3D?

One day, not long ago, I decided to start a website to share what I learned. To my surprise, it was me who started learning! The best way to learn is by sharing what you learned. It just forces you to document everything in a simple process, It works like magic, try it.

What top tip can you share with us?

As you already know, CGI, in general, is cool! Just by watching a new show reel that just comes out, or a software update can lead you to change you focus on a new topic! One of the things I regret is that I didn't focus on one area, I was learning VFX, sculpting, scripting, Visualisation etc.. you name it! the result was mediocre work. It's only when I started focusing on one industry that I improved. For me it was 3D Visualisation. You can always learn more topics, but one at a time.


Klaas Nienhuis

What do you wish you knew when you started 3D?

I didn't really start in 3D. I did it on the side and then that part of my work grew. I find it pretty difficult to find a good piece of advice. For me, being very specialized has worked out great but only with a solid network to collaborate with. I think I wish somebody had told me to put more effort in a good network of friends and businesses while specializing my skillset.

What top tip can you share with us?

The second part is easy, my top tip is to learn programming. Even if it's just a little bit. The stuff you can do with simple one-line scripts in 3ds Max is way more powerful than having a big toolbox of downloaded scripts.


Neil Poppleton

What do you wish you knew when you started 3D?

Its all about enjoying the learning experience and ride.

What top tip can you share with us?

Be good at time management etc, but the best tool i have used almost every week for the past 17 years is PSD manager. A golden tool.


David Houston

What do you wish you knew when you started 3D?

When I started out I wish that Pinterest was available, its such and invaluable resource for collating project information, research and advice from other artists. Being able to share resource globally helps a great deal in planning and developing a project from a lighting and composition perspective.

What top tip can you share with us?

My best tool I use and probably my biggest hack now is a script called find and bind, it aligns any sun to the hot spot of an hdri in an instance. It also allows you to physically rotate the dome light and that automatically shifts the light position in both your dome light map and also your environment map. 


Patric Verstraete

What do you wish you knew when you started 3D?

The best way to start in 3D is to get as much software as you can and play around with it, until you find the one which is best for you. I didn’t do that, I started with 3ds max. At that time it was 3ds Max 6 with the disks! So it was really hard to make progress because there weren’t any tutorials, or very few. So I started to learn it by myself.

Then go onto the web and join forums, find tutorials, get in touch with people and share your work and ask for feedback. It is important to get extra comments on mistakes that you don't see, and last but not least, never give up!

What top tip can you share with us?

Some plugins that everyone needs in 3D Visualisation ...
Forest Pack: Forest Pack does away with all the hassle by providing not only the scattering tools, but also large libraries of photorealistic trees and plants.

Rail Clone: Generate complex parametric objects including fences, stairs and floors faster than ever before.

Vray render-engine: I started off visualising using Mental Ray, but once I gave V-Ray a go, I never looked back.

Of course there are many scripts available, but the most important to me are ...

Floor Generator: This plugin will let you create individually boarded floors, perfect for wooden floors.

Image Composition Helper: Automatically visualise the Rule of Thirds inside the 3ds Max Viewport to instantly improve the look of both your 3D static renders and animation.

Relink Bitmaps: Easily relink missing files like bitmaps, VRayMeshes, Mental Ray proxies and VRayHDRI when they change directories or when you move computers.


Dimitar Gongalov

What do you wish you knew when you started 3D?

I would have liked to know - what is the best software to produce the most realistic images. What is the shortest way to super realistic images (is it modelling, texturing or lighting) I found that the order is light setup then texturing and finally modelling.

What top tip can you share with us?

My top scripts I cannot work without are...

VMC Script: I use this every day.

Turbo Reverse: For remodeling some ready made models.


Paul Roberts

Surprisingly Paul, Training Manager at iToo Software said.. 

"use RailClone and Forest Pack, it'll make all your dreams come true!"


Matt Guetta

What do you wish you knew when you started 3D?

When I begun I was always doing everything in the renderer. I've never been a 'Photoshop guy' but I really wish I knew how to uses passes, 32b exr etc. to use compositing to improve/edit my images. Would save me tons of render times and probably makes my life easier.

When I begin 3D I was mainly doing stills, now I'm mainly doing movies. From the beginning I've always worked with the idea of doing stills as I'll handle movies (no stamp, only mattes rendered etc.) and I really recommend doing all you can in that spirit.

Using a movie pipeline for stills will really help you to improve your workflow and makes your render better!

What top tip can you share with us?

In the past few months I've switched to ArionFX (Nuke/AE/PS) It lets you do a really nice Tone Mapping in post-production after tons of layers/passes adjustments. I really love this little plugin :)


James Dowling

What do you wish you knew when you started 3D?

Putting useful things in the quads so you have them one click away. Some I have in mine are, insert loop, centre pivot to object. Copy and paste from file.

Change the space bar shortcut from 'selection lock toggle'. When I first started 3D Max I always hit it by accident and spent the following hour trying to work out what had happened.

Double clicking on an edge selects the whole loop.

Right click on any modifier and enabling Off in viewport to make your scene more manageable to navigate.

What top tip can you share with us?

Cleaner script for sorting out ClampTex and deleting Link Composites from imported CAD. ClampTex and Link Composites can kill loading and render times. 


Eldridge Felder

What do you wish you knew when you started 3D?

If I go back to starting off in 3D, I would have focused more on learning how to Unwrap. Today I have a much better understanding of it, and actually really enjoy unwrapping. But when I started it was something I found confusing. But now looking back at my beginner models, I could have pushed them a lot further if I had a better understanding of clean unwrapping. I also have a much better understanding of modeling and texturing as well, but I think unwrapping is very important.

What top tip can you share with us?

Depends on what is being created and the end user's experience. For pre-renders I would say V-Ray, Multiscatter, and Grow-FX could be all you need for really nice complex interior or exterior renderings. Phoenix FD by Chaos Group comes in handy as well when Fire or Water effects are needed.


A massive thank you all of the awesome artists that contributed to this article. I would love to hear your answers in the comments below.

Tools Mentioned

Hey, I'm Jake. I am a 3D Visualisation Render Artist and CGI Consultant. 

Over the years I have been blessed to have worked on extraordinary projects with dream clients from all around the world. From Super Yachts in Monaco to Private Jets and Luxury Apartments in London.

I now like travelling the world whilst freelancing, writing about 3D, teaching through my video training and giving talks.

The Quickest Way To Make 360 Renders in 3ds Max + How To Render Multiple Views On One Machine

The Quickest Way To Make 360 Renders in 3ds Max + How To Render Multiple Views On One Machine

Today I am going to show you how to create 360 stereoscopic renders. We can use these 360's on Websites, Apps, Facebook, Youtube, Octulus Rift and Google Cardboard. I will also show you how you can render multiple views locally on one machine. In a later lesson I will show you how to add hotspots. But first let's create some 360's. You can download the step by step PDF including the render settings.