It’s that time of year…

Black Friday and Cyber Monday have become a great time to get 3D software, models, and courses. Mainly because everyone has a sale on!

If you have a new skill you want to learn, a model you want to buy, or some software to buy, now is the time to get involved.

Here are some of the best offers in one place!

  • Need a website? Squarespace is offering 10% off. You are reading this on a Squarespace site. Click Here to see the offer. (Use BLKFRI10)

  • Need Equipment? Here is all the stuff on my desk… Click Here.

  • Need Cloud Credits? Not using Chaos Cloud yet? You should, Click Here for free credits. ⭐ Chaos is also offering 20% off until 29th November using BF21 on checkout.

  • I am offering Every Course I have released in a special bundle. Click Here!

  • Need Photoshop, After Effects, or the whole Creative Cloud!? Adobe is offering between 39% to 70% off for the year! Click Here.

  • Need Forest Pack or Rail Clone? iToo have you covered with discounts on all software. Click Here.

  • BBB3viz is selling his incredible models with a 40% discount. Click Here.

  • Turbosquid has up to 50% off on selected 3d models. Click Here.


πŸ™‹β€β™‚οΈ Please note I will earn some referral commission on some links at no cost to you.

6 QUICK TIPS To Increase Photo Realism with 3ds Max and V-Ray

EASY Tips For Photorealism in 3D | Improve Your Realistic Rendering

Want to know how to create photorealistic images? In this article, I’ll show you 6 quick tips for increasing photorealism in your 3D scene. I will be demoing with V-Ray for 3ds Max but most of these tips will be useful for any 3D artist in any 3D software.

Part of the reason that 3d rendering is getting more and more realistic every year is due to more computing power. Everything you see in a 3d rendering is made up of polygons. More computing power means we can render more polygons than ever before. More polygons mean more details and more details mean more photorealistic models.

COMPUTER POWER > MORE POLYGONS > MORE REALISTIC

Our job in 3d graphics is to convince the viewer that what they are looking at is real. We are modern-day magicians just with a whole lot of tech and computer power. But the tech and power alone won't cut it... so let's take a look at 6 tips to convince your viewers your visuals are real...

1. Life's Not Perfect

The most obvious giveaway that an image is a 3D render is that it's too perfect. In this image, the pictures chairs and table are all dead straight. There is no way you could do this in reality if you tried.

So a good thing to do before render time is to rotate and move things about ever so slightly. Just note that we usually do this with Snaps by degree on, so it rotates by 1 degree or 5. But now is a good time to turn this of and make very small rotations and movements.

You can see the difference when we compare these 3d renders.

If you want to explore adding more chaos to your 3d renderings, check out the Physics video where we look at stacking objects and using gravity, wind, and explosions to randomise placements of objects.

2. Same Same But Different

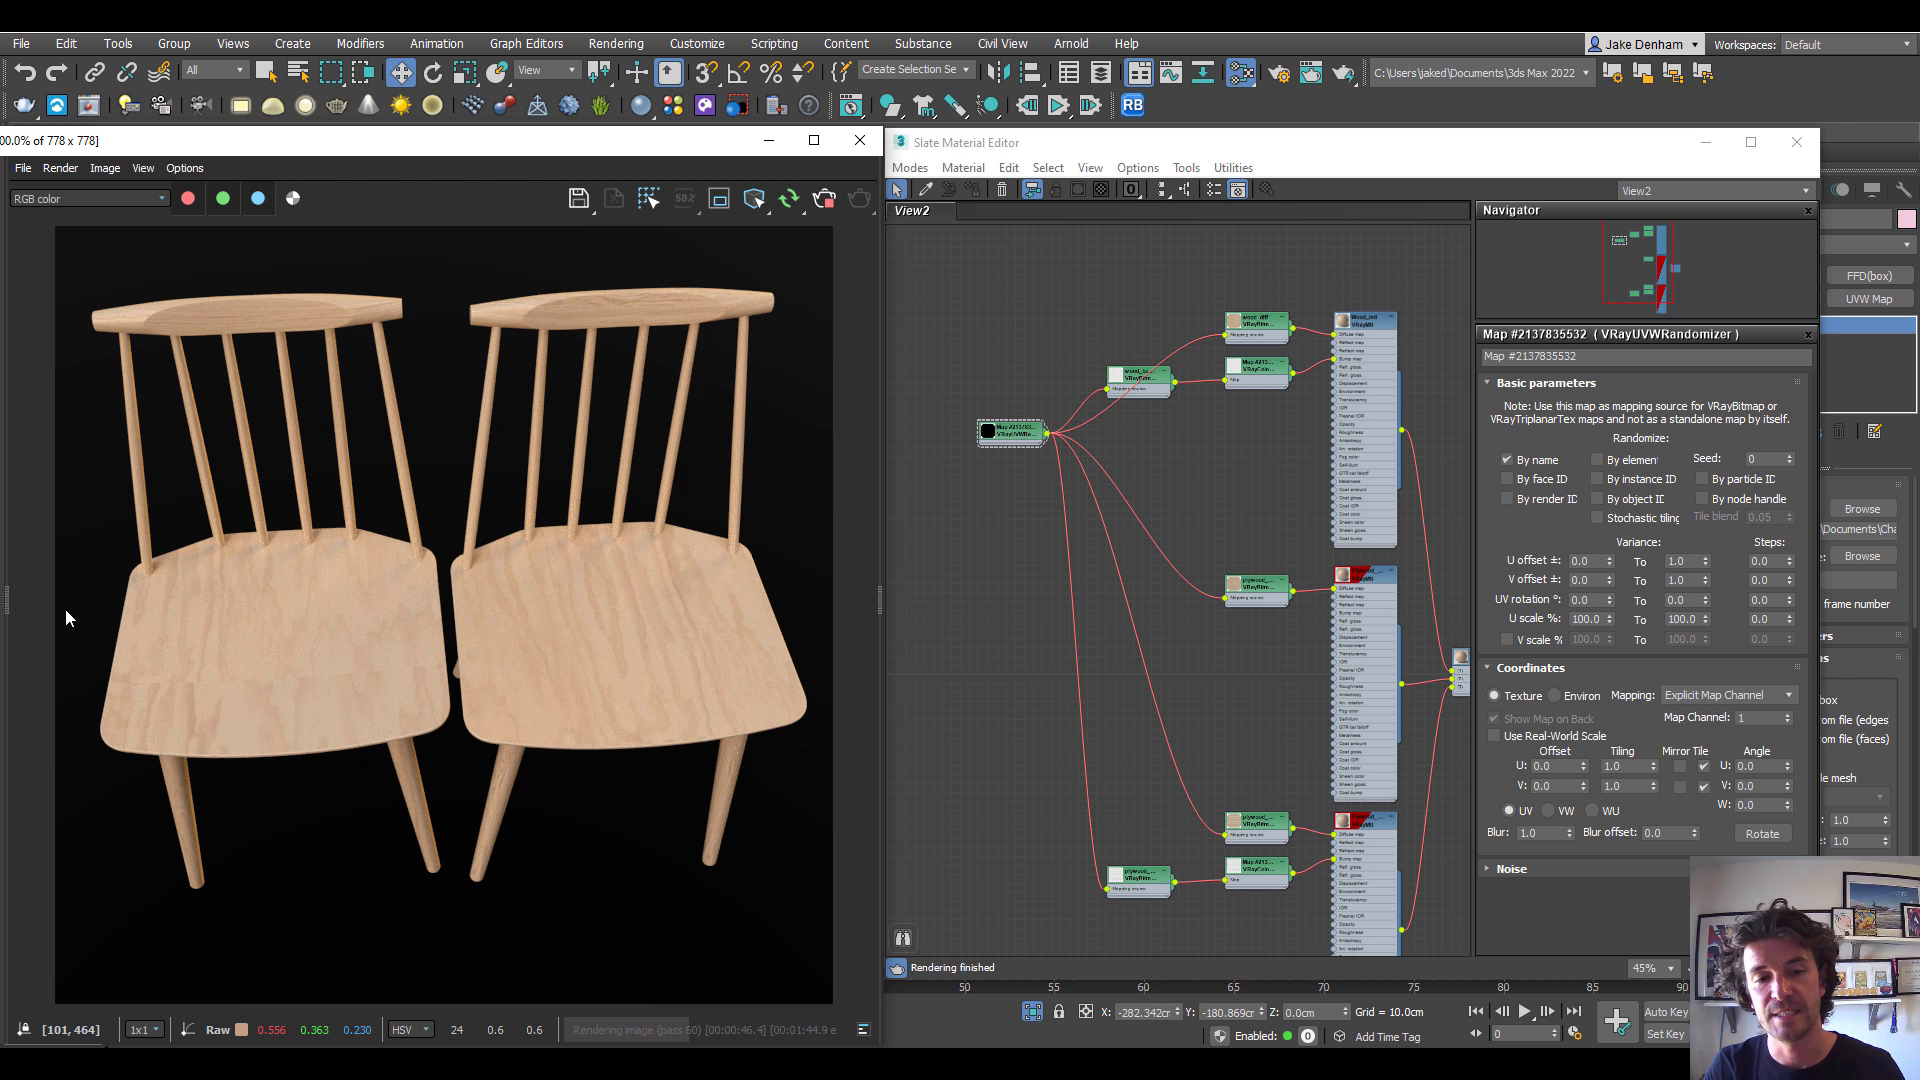
Using the same model is cool and all but when you have a few lined up you are going to start noticing that they are all exactly the same. In this example, we can see that the wood grain is in the same place on each chair.

This can be easily solved, even if the objects are instanced. Go into the material editor. Grab the material using the eyedropper. Add a VRayUVWRandomizer map. Plug the same one into all of the maps. You can choose by name and this will offset the texture depending on the name. Turn off the UV Rotation as we do not what the texture to rotate. And now each chair will have varied textures

3. Go Hard Or Go Home

Another giveaway that something is a 3d model is the hard edges. When we build in 3d the edges are hard by default. We can overcome this in a couple of ways. The first way is with the Chamfer modifier.

The second way is by doing it in the material with a map. Add a VrayEdgeTex Map. And we can see that has rounded the corners for us, making a more photorealistic model. 

4. Make Some Noise

Nothing in life is really flat, so nor should your 3d models. To add some variation you can Quadify Mesh. This will add some more faces to your object and then add a noise modifier. Try not to overdo this one you barely want to notice it.

5. Go Organic

It's not just hard objects that we can soften up. Years ago natural objects such as trees, plants, flowers, pillows and fabric were hard to make look realistic in 3d renders because we had so few polygons to play with.

But now we have more than enough to make things look as real as real life. With Chaos cosmos now there is no need not to have a few organic objects to your scene.

Adding a throw and positioning it with a FFD modifier is going to add realistic details. Or you can use the cloth modifier to do something similar.

Talking of the cloth modifier, we can combine the cloth modifier with cushions to drop them onto the sofa. This will make it sit nicer than if we just try to place it.

Watch the video below for the steps…

6. Keeping It Real

Keeping things real is important if you want your 3d renders to look real. This goes for lights, materials, and cameras. If you use real-world constraints in your 3d images you will get real-world results. The closer to reality our virtual world is the more realistic it will seem.

This is why it is a good idea to keep materials on a real-world scale. In the V-Ray Asset Browser keep Real World on. Then whenever we create an object and add a UVW Mapping modifier with real-world on, it will all come in at the correct scale. This is a really useful habit to get into if you want photorealistic images. 

Real-world means we are telling 3ds max that this texture is 100cm x 100cm in real life.

This goes for models too. Just eyeballing and scaling is pretty lucky dip and I would avoid this where possible. Most models available now are modelled to real-world size. But if they are not to real-world you can always check the manufactures website and make sure you are matching the exact dimensions.

There are many other things that will affect your ability to create photorealistic images, high-quality materials, realistic details, image resolution, etc... But creating cutting-edge photorealistic 3D images is no longer reserved for 3D professionals with advanced software or the graphics guru. Check out the Learn 3D page for a simplified look at creating 3d renders

Render On!

Got Problems?

Got Problems?

You can get frustrated or you can look at it as a test to find a solution.

Once you get to the Solution,

  • you get to keep that solution.

  • you get to use it over and over again

  • you get to stack your solutions into a pile

when you stack your Solutions you get Experience.

What do problems mean? Solutions!

What do Solutions make? Experience!

What do you need? Experience!

Problems Solved = Solutions // Solutions Multiplied = Experience

.... Welcome the problems :)

Render on!

P.S Want some FREE Chaos Cloud Credits? Click Here!

You're Not A 3D Artist. 😲

You're Not A 3D Artist. You're a 3D Problem Solver. You get asked for something by a client. You then get to work on how to create it.

We get asked to do things and we figure it out.


In your career, you will be given models, files, drawings, footage, or scripts from all over the place. You need to work out how to get it into software, create it, render it, use it, composite it or send it... We are problem solvers. That's the job.


It's not just knowing how to do things. It is knowing how to solve what is thrown at you. How do you get better at solving what is thrown at you? Experience


How do we get experience? By creating a solution to a problem.
When you have solved multiple problems (solutions) you get experience.

Problems Solved = Solutions // Solutions Multiplied = Experience

Jobs won't always be easy.
Having experience will make them easier.
Experience is just having solved more problems.

Go solve some problems 😊

Render On!

No Time To Prepare?

What did you think of Murphy's Law? Did you get Practicing?

The reality is you need to practice like you are possessed. 

But I know... what if you don't have the time?

Well, did you know that Urgent (emails reply's, tidying up) and Important are not the same? 

Urgent just gets you back to baseline. (inbox 0, having a clean house)

Important is when future you looks back and has achieved something you are actually proud of. 

The most urgent thing should be to schedule time for the important and make it sacred.

That feeling of unanswered emails, people waiting on you is uncomfortable. That uncomfortable feeling needs to be translated from urgent things to important things. 

You want to feel that discomfort when the important work is not done.

Here is some important work for you... Click Here

Adversity Is Coming

Adversity is going to come, not if, but when.

The client will change things,
your computer will break,
software will crash...

You will not get through your career without encountering challenges like these.

But what can we do about adversity?

Murphy's Law! Heard of it?

Murphy's Law! Heard of it?

Here's what we know...

  1. We know "anything that can go wrong will go wrong"

  2. We know that Luck favors the Prepared.

  3. Training is Preparation.

Professionals train, athletes train, we should train.

Why?
The better we prepare the better we can deal with the situation.

πŸ‹οΈβ€β™‚οΈ You can’t walk into a gym and lift big straight away.
You won’t get through projects without heavy lifts.

⚽ Professional Footballers are good. But they still train all week. What for? Match Day!
Your Client Projects are your Match Day.

CLIENT PROJECTS = MATCH DAY

You train and practice so you know the best strategy for your Client Projects.

We are not just trying to make better images we are making better abilities, skills, and techniques.

Skills give you options.

ο»Ώ

You can't control what adversity will come. But you can control how you will respond to it.

Don't focus on the result, focus on the day-to-day grind and prepare for the high-pressure moments.


We train, so when adversity comes we will be ready.

Want my best training? Click Here

Can You Juggle? πŸ€Ήβ€β™€οΈ

Juggling.jpg

EXPERIENCE > KNOWLEDGE

Can You Juggle? πŸ€Ήβ€β™€οΈ
Go to Amazon, buy the best-selling book on juggling.
πŸ“– Read it.
Can you juggle?

Hell No!

You learn to juggle by juggling.
Practicing, failing, picking it up again, learning from mistakes, and improving naturally.

It's the same principle for your art.
YOU CREATE BETTER IMAGES BY CREATING IMAGES. 
You can't be an artist that doesn't create art! Go Make Some Art.

Want to uplevel your CGI skills?
Take the Course

Tactics Vs Strategy

Jake-Presenting.jpg

Have you ever enrolled in a course and never started it? Remember that feeling of joy when the payment went through and knowing your life is going to change? Or you watched the first two lessons, but never picked it up again. That's because the strategy was missing.

Courses bridge the gap between where you are and where you want to be. They solve a problem. You can find the solution through trial and error, or learn from someone who’s done it before.

Whichever way you choose you need two things. 

  1. A Tactic (the course)

  2. A Strategy (the schedule to complete the course)

You can’t bridge the gap with only a tactic, you need a strategy too! That's the difference between students that fail and students that succeed.

Enrol In Course (Tactic)

+ Schedule Time (Strategy)

= Life You Want (Solution)

Untitled design (11).png

So, What’s The Strategy?

I’m glad you asked. A method called Don't Break the Chain (or The Seinfeld Method) The idea is to put a calendar on the wall in a prominent place. For each day you complete a section of the course, put a big X on the calendar. After a few days, you’ll have a chain. Each day the chain will get longer. This is pretty motivating, then all you have to do is not break the chain. It sounds easy because it is. And it works.

Keep in mind what is going to improve for you when you take action every day. Below is a link to the skills and tactics that helped me in creating the work I wanted to do. Combine these with the right strategy and you’ll be earning good money from CGI work in no time.

Courses For 3D Artists

CGI News: Fake Interiors, Desks, and Evermotion Subscriptions 🏒

"Simplifying the techniques used in the CGI industry."

Here are 3 things I thought were worth sharing this week:


πŸ”¨ Tools

wParallax

A really interesting method to create realistic interiors using just one plane. The method is often used in video games and now we can take advantage of it for architectural visualisation.

https://wparallax.com/

πŸ“Ί WATCH

CGI Equipment

If you missed it here is the current equipment I use and the home set-up. I have since moved to co-working. Shall I make a travel/remote working set-up video? Comment on the video if you think so.

https://youtu.be/ZInOLtMi8qE

πŸ”§ Tools

Evermotion Subscription

Evermotion has announced a subscription service to access their model collection. This could be a good idea if you find yourself needing a lot of high-quality assets. There are currently 5 options to choose from.

https://evermotion.org/shop/evermotion_pass

Thanks for reading! If you like this newsletter and want to support it, join a course or refer a friend.


Render On!

CGI News: My Favourite Website, 3ds Max Update + New Exterior Tutorial 🌳

"Simplifying the techniques used in the CGI industry."

Here are 3 things I thought were worth sharing this week:


πŸ“– Tools

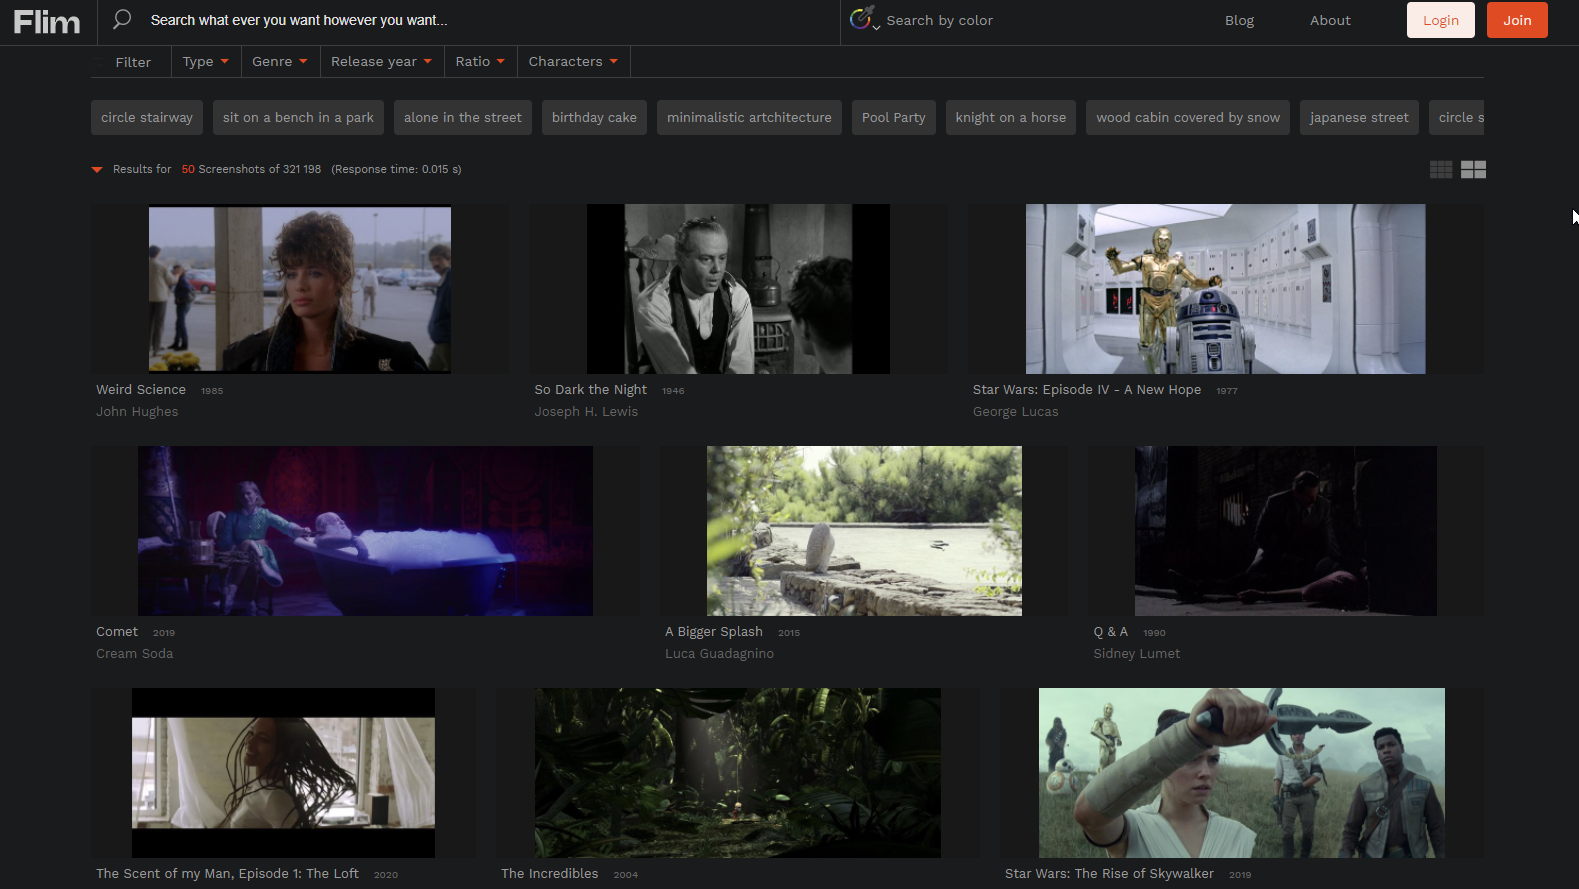
Film.ai

I absolutely love this site. Whether you are looking for inspiration or color schemes, this is going to be massively useful for influencing your images.

https://beta.flim.ai/

πŸ“Ί WATCH

Fast Exteriors

Take a watch of a new lecture for the exterior visualisation course on YouTube. We utilise Chaos Cosmos and Material Library to quickly put together a Car Advert proposal.

https://youtu.be/277Jb3rJBj4

πŸ“– Tools

3ds Max 2022.1

3ds Max 2022 has received its first update. The 2022.1 update boasts Faster Smart Extrude, Deformation Modifier, Enhanced Smooth Modifier. More details can be found below.

https://makeanything.autodesk.com/3dsmax

Thanks for reading! If you like this newsletter and want to support it, join a course or refer a friend.


Render On!

CGI News: City Building, Image of the Week, and Photorealistic Rendering πŸ™

"Simplifying the techniques used in the CGI industry."

Here are 3 things I thought were worth sharing this week:


πŸ“– READ

Photorealistic Visualisation: 5 Tips

In this article, you will learn the 5 key steps to create photorealistic renderings, whether you have been using 3ds Max for years or are just starting out you should find this article useful.

https://www.luxuryvisuals.com/jaked3d/photorealistic-rendering-tips

❎ AWARDS

Image of the Week: Arif Aziz

Image of the week is from Arif Aziz who created these interior renders and received his Certificate of Attendance. Congrats Arif.


Want to make images like Arif? Click here

Arif IOW.jpg

πŸ“Ί WATCH

iToo's video demonstrates a really smart way to build cities and background buildings using their tool TheParametricLibrary

https://www.youtube.com/watch?v=R2aLaakRKj4&t=79s

Thanks for reading! If you like this newsletter and want to support it, join a course or refer a friend.


Render On!

Photorealistic Visualisation: 5 Tips To Create Your First Photorealistic Image in 3ds Max + Vray

Introduction

In this article, you will learn the 5 key steps to create photorealistic renderings, whether you have been using 3ds Max for years or are just starting out you should find this article useful.

We will cover the 3ds Max user interface, and then we will create a virtual 3D photography studio. From there we will look at setting up the lights and camera to get the most realistic renders we can. Don't worry about alpha channels, secondary engines, or image samplers. The key to realism is simplicity.


What Software to use?

First up, for those of you that are new here… (If you aren't feel free to skip this bit). We will use Autodesk 3ds Max and V-Ray from Chaos Group as our render engine.


What is 3Ds Max software? 3Ds Max is a 3D modeling software for architects, designers, and video game artists. 


What is V-Ray? V-Ray is used to render in 3ds Max. V-Ray has a complete set of lighting, shading, and rendering tools that can be used with 3ds Max.


The following tips are taken from a free kickstarter course that can be found here. Feel free to just jump straight over there if you want a step-by-step guide. 

 Now, let's get started,


1. Learn the User Interface (UI). These are the keys to the kingdom, this is how we navigate through 3D space. The first lesson introduces the user interface of 3ds Max.


2. Get your 3d model into 3ds Max. There are plenty of places to get a 3D model if you don't have your own. In this video, I show you how to bring in a 3D model you have made, been sent or downloaded.


3. Create your virtual studio. We are virtual photographers so we need to do as real photography. This is how we achieve 'photo' realism.


4. Setting up your camera and lights. Realistic lighting is the key to photorealistic renderings. As we are creating a studio scene we will be using artificial lighting (interior lights) as opposed to a HDRI or sun.


5. Interactive render. Finally, we use the interactive render to see our 3D rendering. Interactive render saves render time and allows us to see our results before the final render. Once we are happy we can render locally or use one of the cloud services such as Chaos Cloud. As you will see when it comes to rendering our final image there is no need to change the 3ds Max or Vray 5 render settings.


If you want to explore how we can add post-production to our image then have a watch of the whole mini course.

Conclusion

Photorealistic rendering has become very popular, and it’s easy to see why. Entertainment is moving to digital. Just think back to the last music video you saw, I bet it had an element of CGI in it. Products are already there, if you viewed a product in an online store it was likely 3D. Advertising has been doing it for years. And now, photography is moving to full CGI for a ton of reasons.

Will you be prepared? Do you want step-by-step instructions to implement all these tips?

Watch all the lessons here, free!

CGI News: White Balance, 100+ Models and Cloud Updates β›…

"Simplifying the techniques used in the CGI industry."

Here are 3 things I thought were worth sharing this week:


πŸ”¨ TOOLS

100+ new models added to Chaos Cosmos

Chaos Cosmos has received its first update. The update adds over 100 new 3D models.

https://cosmos.chaos.com/


πŸ“Ί WATCH

How to use White Balance in 3ds Max

Quite a few new videos have been added to the YouTube channel. Including a white balance video showing how to change the overall temperature of your image in 3ds Max and V-Ray.

https://youtu.be/VzANLfTyf_Q


πŸ”¨ TOOLS

Chaos Cloud update

Chaos Cosmos wasn't the only one to get an update. Chaos Cloud has too. The update enables us to put credit limits per image, job analytics, batch rendering, and GPU rendering.

Get 20 Free Cloud Credits Here

Thanks for reading! If you like this newsletter and want to support it, join a course or refer a friend.


Render On!

CGI News: Project Starline, V-Ray Frame Buffer and Luxury Visuals ⭐

"Simplifying the techniques used in the CGI industry."

Here are 3 things I thought were worth sharing this week:

πŸ“Ί WATCH

Google's Project Starline

Check out Google's Project Starline. It looks like some clever use of Normal Maps makes you feel like you are there on video calls.


πŸ”¨ TOOLS

V-Ray Frame Buffer Vs Output image

Some people were having trouble with the V-Ray frame buffer and the output image not matching. If you are struggling to make your output files look the same when saving your image out of 3ds Max and V-Ray then this could be the solution.

πŸ“° ET CETERA

LuxuryVisuals.com

The Luxury Visuals website has had an update. Feel free to take a look around and let me know what you think. Be sure to check out the Tech and Blog sections.

Thanks for reading! If you like this newsletter and want to support it, join a course or refer a friend.

Render On!

The Secret Render Button πŸ”˜

Have you ever looked at another CGI Artist's render and thought...

"What's the secret? There is something that they know about 3D rendering that I don't."

Secret Buttons copy.jpg


Want to know the secret to create photorealistic images? πŸ§β€β™‚οΈ

It is easier to believe that there is a magic 'photorealistic image' button. Hidden deep in the render settings that only the elite CGI artists know how to access.

It doesn't exist.

Believe me, I spent a long time searching for that secret photorealistic render tick box.

In a world of 5-minute abs and master CGI in 90 minutes courses 😁, it does feel easier to believe that there is a secret button.


The truth about architectural visualisations. πŸ‘‚

The truth is, it takes good old-fashioned experience. Not the type of experience you see on a 3D rendering job listing. I am talking about habit.

I can teach you everything I know. Everything I learned from my experience in architectural visualisations.

But you have to have your own experience. This goes for any of the creative industries.

If you use my experience you will learn the tools faster than I did. But you have to use the tools frequently.

You can't be a 3D Artist that doesn't create 3D art!


Experience. πŸ“ˆ

In the lectures, there are Q&A sections. I have the experience to answer your question because, once upon a time, I stayed up all night trying to fix that problem. That's experience.

This is how you learn and grow, not by ticking off a course as done βœ…, but by using it.

This is what Alex did.

Meet Alex.

Alex took the V-Ray Certification Course and has been an active member of the student community group. It has been inspiring to watch him develop his skillset and post his architectural renders frequently.

The lectures give you the head start, but you need to hone your mind into thinking like a 3D artist in a CGI Studio. You do that by working on your 3D modeling, tinkering with light sources, and working on your own CGI projects.

This work ethic landed Alex on the Creativepool home page and allowed him to create a solid portfolio of CGI projects.

2021-05-25 09_34_09-Facebook.png


You can only access the magic photorealistic rendering button by working on your craft every day.

So what do you say? Ready to get some experience?

Check out the V-Ray Certification Course.

CGI News: MetaHuman, Relighting Humans and Autodesk USD πŸ’‘

"Simplifying the techniques used in the CGI industry."

Here are 3 things I thought were worth sharing this week:

πŸ”¨ TOOLS

MetaHuman Creator

MetaHuman Creator is a cloud-based app that allows anyone to create photorealistic digital humans, fully rigged and complete with hair and clothing. MetaHuman comes from Unreal Engine and has a free Early Acces program. This one is really worth checking out.

Find out more here - https://pxlme.me/MetaHuman

πŸ“Ί WATCH

Relight Portraits for Background Replacement

Here is a fascinating video on how technology can change the background of a portrait and relight the subject to create much more realistic results. The process uses only a single RGB image and a HDR image to light the environment.


πŸ”¨ TOOLS

Autodesk releases USD for 3ds Max

Autodesk has released USD for 3ds Max. The plugin enables users to import and export meshes and materials between Autodesk products. For example Maya and 3ds Max. This will enable non-destructive editing between artists and studios.

You can find out more here - https://pxlme.me/3dsMax-USD


Thanks for reading! If you like this newsletter and want to support it, join a course or refer a friend.

Render On!

Footer.jpg

CGI News: New content, adding people, and image of the week 🀩

"Simplifying the techniques used in the CGI industry."

Here are 3 things I thought were worth sharing this week:

❎ COMMUNITY

Image of the week

Blal As'ad posted a top-quality set of images as part of the interior rendering course. He said "I learned a lot of very useful things, thank you very much for this amazing course."

If you would like to create images like Blal, check out the interior rendering course.

Credit: Blal As'ad, student of the Interior Rendering Course

Credit: Blal As'ad, student of the Interior Rendering Course


πŸ“Ί WATCH

Updates to the Interior Rendering Course.

The Interior Rendering Course is continually updated. A whole new section has been added called Adding People to our Images. In this section, we look at how we can add life to our image using both 2D and 3D people.


πŸ“° ET CETERA

Photoshop for CGI Artists - The Quickest Way

The Photoshop for CGI Artist course launched last month and currently has a 5-star rating. It is designed for anyone wanting to do professional post-production on their renders. If that sounds like you here is a discount code.


Thanks for reading! If you like this newsletter and want to support it, join a course or refer a friend.


Render On!

CGI News: Why render 32 bit, the most important skill of all and image of the week

"Simplifying the techniques used in the CGI industry."

Here are 3 things I thought were worth sharing this week:

❎ COMMUNITY

Image of the week

Check out the 'Luxury Visual' Andrej Banasik of Incisive Studio posted in the Facebook Group. Andrej said "I love it personally. For now it's probably one of my best uncommercial renders."

Andrej-web.jpg

πŸ“Ί WATCH

Understand 32-bit Renders in 3:20 Minutes | Why use 32-bit images?

Most CG artists are familiar with 32-bit images. It gives you a wide dynamic range, maximum color bit depth, and is used by most of the big players in visual effects to create Hollywood movie magic.

So why do you need to render 32-bit images? In this video, I answer that question:

πŸ“– READ

What is the most important skill of all? πŸ’­

We all know that learning a new skill is beneficial and helps us to stay relevant. We will get better at our job or even get a new job. As the rate of change increases, it is clear that we need to adapt our skills and sometimes learn new ones.

So why the friction? πŸš΅β€β™‚οΈ

Read the article:

Thanks for reading! If you like this newsletter and want to support it, join a course or refer a friend.

Render On!

CGI News: 3ds Max update, CGI artist laptop and a free Photoshop tutorial

Header.jpg

"Simplifying the techniques used in the CGI industry."

Here are 3 things I thought were worth sharing this week:

πŸ”¨ TOOLS

3ds Max 2022 Released

Autodesk has released the latest instalment of 3ds Max. This version comes with updates to many modifiers including Slice, Symmetry, Extrude and Relax. As well as updates to Smart Extrude that introduce "Cut Through" and Edit Poly support.

πŸ“Ί WATCH

Photoshop For CGI Tutorial

Learn the basics of Photoshop in 30 minutes. This tutorial is to familiarize existing or aspiring CGI artists with Adobe Photoshop. Going over the basic tools and aspects to know when starting with Photoshop as a CGI artist.

πŸ“– READ

The CGI Artist Desk Setup

Here is what laptop I use and everything else on my desk. Since not being able to travel I have been building a semi-permanent desk set-up. I want it to be as self-contained as possible without spending a ton of money. So here is how I got on.

Thanks for reading! If you like this newsletter and want to support it, join a course or refer a friend.

Render On!

Footer.jpg

Image saved from V-Ray Frame Buffer not the same

Issue Solved: Saving Renders. V-Ray Frame Buffer rendering looks different when opened in Photoshop or image viewer.

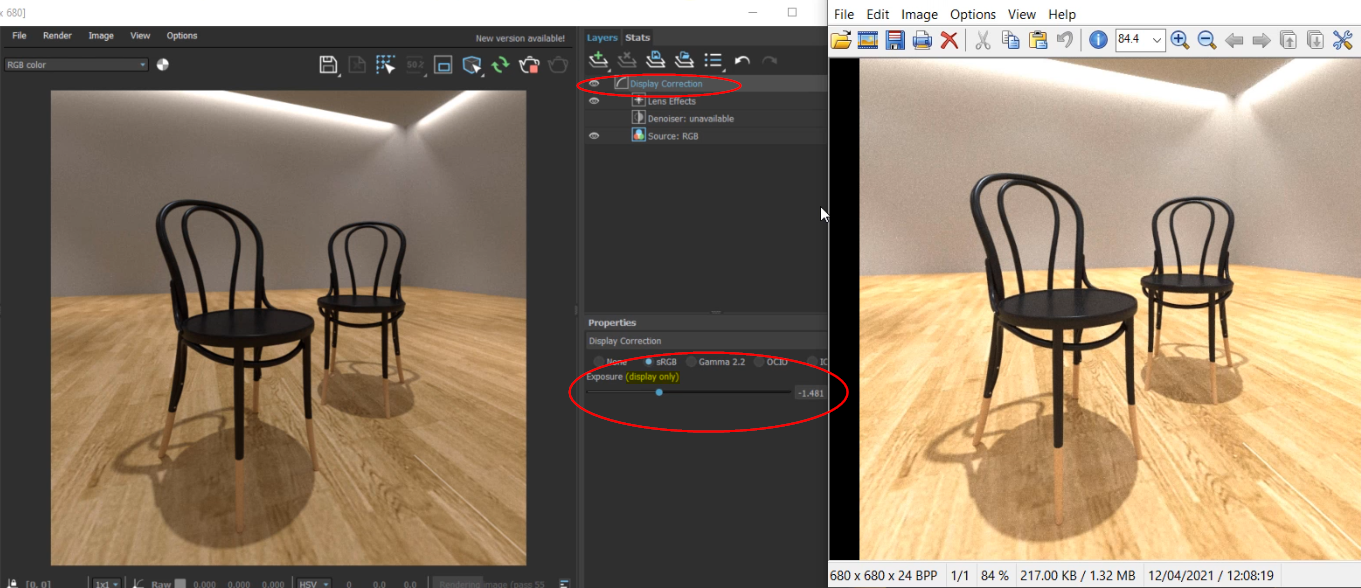
When saving a render out of V-Ray 5 in 3ds Max, the .jpg (or other image formats) looks different to the render in 3ds Max. We look at a students scene to see why this is happening. And how we can make the saved file and the frame buffer file look the same.

compare.jpg

If you are struggling to make your renderings look the same when saving out of 3ds Max and V-Ray this should help.

πŸ€” Why is this happening?

Opening the scene and hitting the interactive rendering button I can see the exposure correction is being made in the Display Correction. If I save this image out as a .jpg and open it next to our frame buffer, we are going to see it looks very different. The rendering looks overexposed compared to the image in the frame buffer.

This is because the rendering is saving out with no exposure correction. The reason for this is because the exposure correction of 1.4, in this case, is being made in the Display Correction. And if you look next to Exposure you can see in brackets Display Only. So this is not changing the exposure on our render just on the display.

gamma.png

πŸ”§ What's the fix?

To change the exposure settings we want to add an exposure layer. Click the + and add an exposure adjustment layer. We can change the exposure here. Then save the current channel as a jpeg and if we compare them we can see they are the same.

2021-04-13 09_03_41-VFB difference - VLC media player.png

πŸ”‘ Conclusion

If you are struggling to get the render output and the image in the V-Ray frame buffer to match make sure you are adding adjustment layers to your image rather than making updates in the display correction

Gamma: This solved the issue for the students. If this did not solve the issue for you, look into the gamma settings. Some people have struggled with gamma corrections resulting in a VFB and rendering mismatch.

Image Channels: It is also worth checking your image channels in the V-Ray VFB. Over where the separate render channels are, such as the alpha channel and RGB color channel are. Save the effectsResult channel out and see if that has the color corrections applied.


Get V-Ray here - https://pxlme.me/wA3IkNh5
20 free Chaos Cloud Credits - https://pxlme.me/a-XJfGea
V-Ray Classes here - www.luxuryvisuals.com/academy