What are you working on that your future self will thank you for?

pexels-andrea-piacquadio-935756-.jpg

3D modelling is the creation of digital assets.
Do you think the need for digital assets is on the rise or declining?

I am going to suggest that the need for digital assets is increasing. Photoshoots, music videos and advertising are now all turning to CGI. Think about the last music video you watched or the last ad you saw. I'm sure that if it's recent then it had an element of CGI.

This is because it is becoming harder and harder to get on set, source products and get crew together in real life. This coupled with the rise in online shopping, demand for more e-commerce product images has increased.

This makes me think about how lucky we are to be involved in the world of 3D. With all the changes that are happening in the world, I feel fortunate to have a skill set that appears to be in demand.

More people are spending time in virtual environments and virtual reality. Again, this trend is only going to continue. So a solid skill to work on is your 3D modelling skills. (Learn free here - https://skl.sh/39R2Vo9)

Being in lockdown currently can be difficult at times. But something that keeps me motivated is asking myself how can I best use this time?

What are you currently working on that your future self will thank you for?

Render On!

Render-On-Jake.jpg

β˜• CGI News February - New Light Mix - Image Comp Helper Update + more πŸ“°

πŸ”¨ TOOLS

Arnold Renderer Now Has Light Mix

Arnold 6.2 for 3ds Max has been released and has some interesting new features. Namely light mix, denoiser and bloom amongst other improvements.

Other than on the modelling course we are yet to explore Arnold Render engine. Is anybody here using Arnold, should I make some videos on it? It does come packaged with 3ds Max and is a solid render engine.

Image Composition Helper Updated

I am a big fan of image comp helper and I was happy to hear that The Faction CGI updated the original script by Christoph Buelter. Image composition helper adds overlays to your 3ds Max viewport to aid composition.

Download the updated script from The Faction CGI's website.

https://thefactioncgi.com/the-faction-blog/2021/1/20/free-script-image-composition-helper-for-3ds-max-updated

❎ COMMUNITY

β€œif you want to build habits that last, join a group where the desired behaviour is the normal behaviour.”
— James Clear, Atomic Habits

The student group continues to grow in both size and quality of work. Some highlights included Graeme Strutt's first 360 product spin and Rahul Kp published some impressive work.

If you would like to join the group you can do so here - https://www.facebook.com/groups/luxuryvisualsacademy

Image Credit Rahul Kp

Image Credit Rahul Kp

πŸ“Ί WATCH

Batch Rendering

Here's how to Render Multiple Cameras In 3ds Max, also known as Batch Rendering.

Auto Vertical Tilt

A pretty quick way to improve your renders with the tick of a button.

πŸ“– READ

Improve your 3ds Max Workflow: Choose Your Best Light Set-up Fast

I worked hard on this one, so check it out I think you'll find it useful. The focus of this post is how you can use scripts to automate repetitive tasks.

https://www.luxuryvisuals.com/jaked3d/hdri-script

πŸ“° ET CETERA

πŸ“ƒ Want to get your Official V-Ray Certificate of Attendance? Details in the Facebook group.

πŸ‘‡ Make a button for Image Comp Helper

β›…Get 20 Free Chaos Cloud Credits

Render On!

Render-On-Jake.jpg

Improve your 3ds Max Workflow: Choose Your Best Light Set-up Fast

The focus of today's post is how we can use scripts to automate a repetitive task. The more we can optimize our workflow and scenes the more energy we can put into the creative tasks. Look at it like leveraging the computer to free up space to focus on our renders.

TL;DR

  • Use a script to render thumbnail renders of each light angle.

  • Review renders and select the desired angle.

  • Useful for selecting what angle to have your HDRI light dome in exterior images.

  • Alternative to doing it manually, now it takes less than 10 seconds.


Being able to create photorealistic renders is a great skill to have. But it is only part of the skill set you need when working for a client or part of a CGI team. Hitting deadlines, staying organised and working efficiently are the other parts. Workflow can be overlooked when working on personal projects where there is no deadline or client making changes.

Some times you don't know what you're looking for until you see it. Typically adding an HDRI and rotating it bit by bit until you reach something that you like may seem like the best method. But what if I told you we could render each angle of a HDRI dome, preview the thumbnails and then choose the best one?

Seeing thumbnail renders of various light scenarios has been added to V-Ray 5 for SketchUp with a tool called Light Gen. I wondered how hard this would be to implement this into 3ds Max.

Light Gen. Image credit jung hoon Han

Light Gen. Image credit jung hoon Han

vlcsnap-2021-01-22-18h21m09s013.jpg
3d artist 16.jpg

It's not the first time I have thought about this. The first mention was in 3D Artist back in 2016, and then again in 2018's post, 5 Tips To Create Your Best Exterior Visual Ever. Both times, I animated the V-Ray light by hand. Keyframing the rotation 10 degrees at a time and rendering the animation.

Now with a script, we can do this in just under 10 seconds! Watch the video below to find out how I did it.

When I saw V-Ray 5 for Sketchup had something called Light Gen I knew it was time to finally write the script I had wanted in 3ds Max for ages. The thing tha...

Resources:

  • This video is from a larger course I created that shows you how to make photo-realistic exterior renders, demonstrates workflow and has tons more time-saving tips. You can find that and more here

  • You can download the script hereο»Ώ

β˜• CGI News - Luxury Visuals (January) πŸ“°

πŸ”¨ TOOLS

Exterior Visualisation Course

The Exterior Visualisation Course has been updated with over 5 hours of new content. All free for current students. I am proud of the end result and how the class manages to explain exterior rendering in an understandable way.

Click here to see the updates on Udemy
and here for Skillshare

❎ COMMUNITY

V-Ray Forum at Solent University

Solent University students received their Official Certificate Of Attendance from Chaos Group. I presented a V-Ray Forum on December 14th. The forum earnt them their COAs and access to the Luxury Visuals V-Ray learning videos. 

I am planning to open this up in March. If you would like to join the waiting list then see the link below.

https://www.luxuryvisuals.com/professional-cgi-artist

πŸ™‹β€β™€οΈ Luxury Visuals Academy Facebook Group

Some excellent images submitted this month from group members. Thanks to Sagar Singh Chandravanshi, Kamelia Biserova, Rahul Kp, Vineeth Radhakrishnan and Andrea Bianchi for submitting such great images.

If you would like to join the group, post your work and get feedback, you can at the link below.

https://www.facebook.com/groups/luxuryvisualsacademy/

Image by Sagar Singh Chandravanshi

Image by Sagar Singh Chandravanshi


πŸ“Ί WATCH

Create a Button for Image Comp Helper or Any Script in 3ds Max | Make Buttons for Scripts

Dragging and dropping a script into the viewport to open the dialogue box isn't very efficient. In this video, I show you how to very easily create a button in your 3ds max toolbar.

https://youtu.be/3EjjT-2ioTI

Use Kelvin Temperatures / Colours in V-Ray Light Mix | 3ds Max + V-Ray 5

V-Ray 5's Light Mix is great but I wish I could use Kelvin temps in the color. Here is my workaround to use Kelvin temperatures rather than colors.

https://youtu.be/md9Z112WjIs

Finally please let me know what you need help on? What would you like to see in these emails and from me this year, how can I help you?

Render On!

Render-On-Jake.jpg

P.S πŸŽ“ Full CGI Courses here.

β˜• CGI News - Luxury Visuals (December) πŸ“°

πŸ”¨ TOOLS

3ds Max 2021.3 Update

3ds Max got an update. Autodesk has added new capabilities to the viewport and improved modeling efficiency. There have been enhancements made to popular modifiers and 3ds Max Retopology Tools. The new retopology tools can be used to reduce the poly count of high polygon assets.

V-Ray Materials improvements in the 3ds Max viewport.

Vlado posted this video of early-stage improvements to V-Ray material representation in 3ds Max 2021’s viewports.

Forest Pack 7 Beta

Forest Pack have added new features to make the scattering plugin even more powerful, check out the video below to see what's new.


❎ COMMUNITY

Luxury Visuals Academy Facebook Group

Some excellent images submitted this month from group members. From studio to full interior and exterior images. Thanks to Moneem Fathalla, Hasan Hakki, Francis Eaton, Rahul Kp, Amit Gedia, Stewart Abram and Graeme Strutt for submitting their images.

If you would like to join the group, post your work and get feedback, you can at the link below.

https://www.facebook.com/groups/luxuryvisualsacademy/

πŸ“Ί WATCH

Using Dirt Maps To Add Streaks and Grunge to Materials

Dirt maps are a great way to add weathering to our materials. They can be tough to control but here is a video to make using V-Ray Dirt Maps easier.

Dirt maps are a great way to add weathering to our materials. They can be tough to control but here is a video to make using V-Ray Dirt Maps easier. Let's fi...

What is Global Illumination and why is Light Mix not working?

First, we need to understand what Global Illumination is. Then we can look at what settings to use. Is using brute force too slow and you want to use Irradiance Map? But you can't get Light Mix working that way. I'll show you the workaround.

Render On!

Render-On-Jake.jpg

P.S πŸŽ“ Full CGI Courses here.

You can't be a 3d artist that doesn't create 3d! (3 Steps)

pexels-cottonbro-4065624--.jpg

Wouldn't it be nice if you could just,

  1. follow a course step by step,

  2. add that image to your portfolio,

  3. send it to a studio or architect and start getting work?

Unfortunately, I would be lying if I said it was that easy.

There is more to 3d than creating the odd good-looking image. Clients hire consistency over good images. They need to know you are reliable and will deliver every time.

2020-11-16 13_32_22-Untitled document - Google Docs.png

There are 3 steps to being able to deliver top-quality images consistently to clients.

Follow these 3 steps and life will be easy. Try to jump to the next one before you are ready and you can fail fast, believe me, I tried.

  1. Understanding the basics of how to use the tools. The most overlooked and where people try to get to the next step, or worse step 3, without really getting their foundations right. You need to have confidence in your tools.

  2. Developing skills in certain areas, such as 3d modeling or creating materials. Your basic knowledge will take you so far. If you want to get to the next level you need to have a deeper understanding of the key areas.

  3. Creating some remarkable images for your portfolio. Don't get me wrong you could just jump to step 3 and render some great images for your portfolio. But without the foundations and the skills from steps 1 and 2, you aren't set up for long-term success.

    You are going to turn up to a studio or start on a client project with a tight deadline and learn the hard way you should have nailed steps one and two.

Start with 1, then 2 and then 3 to create a solid foundation for your career, long term.

pexels-anthony-shkraba-4348401--.jpg

Once you understand the tools and begin to develop specific skills. You need to ask...

How are you going to stand out and differentiate yourself from the thousands of other CGI artists?

The answer is deliberate practice over a sustained period of time. The best writers you know write regularly, the best runners run regularly and the best artists create art regularly.

You can't be a 3d artist that doesn't create 3d!

If you want to be top of the list when a client is looking for a 3d artist then get creating. Set a time, for example, 6-8 am every weekday. With these 10 hours of 'creating' time per week why not aim to create 5 new images by the end of the year. Share them in the Facebook group for feedback and upload them to your portfolio each week.

Don't worry about being great, be good regularly.

Render On!ο»Ώ

Render On Jake.jpg

It Took Me 3,186 Days! | Autodesk University

It has been 3,186 days since I published the blog article pictured below. Ramy Hanna's session at Autodesk University inspired me. It made me want to hone my skills and try to master the craft of CGI. Ramy was doing what I wanted to do. After watching his talk I read his blog whenever he posted and managed to get on to an 8-week CGI course he did with 3D Total. I only spoke with Ramy a few times in the forums and I imagine he doesn't remember me. My point is that we now have the tools to learn from the experience of the best, from afar. We have the ability to learn from people doing what we want to do. So eventually we can do it too.

So, I am happy to say that 3,186 days since posting about Ramy's session. You can now go and bookmark my talk at Autodesk University. The presentation, Using 3ds Max with Photography to Hit Deadlines for Advertising Campaigns will be available on-demand from November 17th.

the original blog post from Feb 23 2012

the original blog post from Feb 23 2012

The whole Autodesk University 2020 conference is virtual and free this year. (no need to fly to Las Vagas) I will be answering any questions between 17th and 20th November whilst Autodesk University 2020 is on.

Whatever area of design you are in, keeping on top of tools and skills is more important for our careers than ever. Knowing you have the knowledge to stay relevant improves confidence in the tools and starts a positive snowball. Autodesk University has 750+ sessions, 350+ live class Q&As, live panels and roundtables led by industry experts.

Recommend.gif

If you are in the design world I strongly urge you to go register for the Autodesk University experience. Maybe even bookmark and give my page a thumbs up. And, maybe in 3,186 days you will be speaking at Autodesk University and own a pair of Autodesk socks!

https://www.autodesk.com/autodesk-university/class/Using-3ds-Max-Photography-Hit-Deadlines-Advertising-Campaigns-2020

IMG-2418.JPG

πŸŽ₯ Watch this new content...

Quite a few YouTube videos so maybe grab some popcorn and get involved 🍿 Most of the videos came from questions on Facebook group so feel free to jump in there and ask CGI related questions.

πŸŽ₯ How To Use V-Ray UVW Randomizer Map in 3ds Max

Here is a look at the V-Ray UVW Randomizer Map and some good uses for it.


πŸŽ₯ Introduction to 3ds Max Tutorial | The Quickest Way


Want to brush up on those 3ds Max essentials? Here is an extract from the Introduction to 3ds Max course. Over on YouTube you can click on the time stamp to jump to that section of the video. Here is what's covered.

  • The 3ds Max Interface and Setup

  • Create, Move, Rotate and Scale in 3ds Max

  • Viewport Navigation in 3ds Max

  • Setting Up Plans and Units in 3ds Max

  • Naming, Changing Colours and Creating Groups in 3ds Max

  • Adding Cameras and Using Safe Frames in 3ds Max


πŸŽ₯ How To Scale a DWG in 3ds Max | Change the Size of a DWG

Trying to rescale a DWG file in 3ds Max?
Here is how to correct the size of your DWG drawing.


πŸŽ₯ How To Use XRef Scenes to speed up 3ds Max

Eric asked how to speed up a high poly scene he was working on.
X-Refs are the answer.


β˜• CGI News - Luxury Visuals (November) πŸ“°

Missed the November fix of CGI news?
Click here to catch up with the latest updates, tools, community and articles. 

Render On!

Render On Jake.jpg
Learn CGI from the experts with simple workflows, tools, and tutorials.

β˜• CGI News - Luxury Visuals (November) πŸ“°

5️⃣ UPDATES

V-Ray 5 and 3ds Max 2021 Course Updates

Firstly, the Interior Visualisation course has been updated so you can follow along with 3ds Max 2021 and V-Ray 5. The course still supports 3ds Max 2018, 2019, 2020 and 2021 as well as V-Ray 3, Next and 5.

https://www.udemy.com/course/3drendering/?referralCode=70ACC0A10C87CF99148C


πŸ”¨ TOOLS

Neural Filters in Photoshop

The latest update of Photoshop has added AI powered filters. Neural Filters are particularly fun and the Sky Replacement tool is also worth a look.

https://youtu.be/215LgUkkUlI


What’s new in Arnold 6.1

Arnold render engine for 3ds Max just got an update. We use Arnold in both the Modelling and Introduction to 3ds Max courses. Check out the link to see what features and improvements have been made.

https://area.autodesk.com/blogs/the-arnold-blog/whats-new-in-arnold-61/


Extend Borders

I have yet to use this but it looks great for modelling. Extend Borders is useful for extruding border edges of an editable poly.

http://www.scriptspot.com/3ds-max/scripts/extend-borders


❎ COMMUNITY

Facebook Group

The facebook group continues to grow and the work continues to get better and better. This month Sneha Desai, Naitik Gupta, Moneem Fathalla, Hasan Hakki and Vineeth Radhakrishnan have all graced us with incredible images.

https://www.facebook.com/groups/luxuryvisualsacademy


πŸ“Ί WATCH

How To Use V-Ray UVW Randomizer Map in 3ds Max

Here is a look at how we can use the V-Ray UVW Randomizer Map.

https://youtu.be/dSO6uN3Dy1I

3ds Max How To Tutorials

In this playlist I share 3ds Max related How To tutorials. Many of these are answers to questions that have been asked from the CGI courses. Make sure to subscribe to know when new ones are out.

https://www.youtube.com/playlist?list=PLQmLVe9epBDx2Yko-Y-bYJJ6SEolbD55P


πŸ“– READ

AI That Makes 3D Humans

A really interesting paper on using artificial intelligence to create 3D models of humans from 2D.

https://shunsukesaito.github.io/PIFuHD/


Render On!

Render On Jake.jpg


πŸŽƒ CGI News - Luxury Visuals (October) πŸ“°

πŸ”¨ TOOLS

Seamless Textures
Architextures is a procedural texture generator that allows you to create and edit seamless textures, bump maps and CAD hatches. 
https://architextures.org/

Lazy Manager
Lazy Manager allows users to copy and paste objects, materials, and modifiers across multiple instances of 3ds Max and includes support for sharing these assets across an entire studio of artists using a shared network location.
https://jokermartini.com/product/lazy-manager/

Image Texture Resizing
Another tool from Joker Martini worth checking out is Image Texture Resizing. With a one-click solution artists can resize images using a non-destructive method. Always leaving the original file untouched and unaltered. At any point in time users can choose to restore their textures to the full resolution if they wish. Anytime a new lower resolution is generated, it uses the original image to generate it.
https://jokermartini.com/product/image-texture-resizing


❎ AWARDS

Student Alex Massey got published on the Creative Pool homepage
Student and Facebook member Alex Massey’s detail shot from the Interior Rendering Course got featured on the Creative Pool homepage. Congrats Alex.
https://bit.ly/3kdgjHK


πŸ“Ί WATCH

Triplanar Map Tutorial 
Here is a really interesting video on Triplaner Mapping from the guys at Corona. Even if you don’t use Corona Render Engine, this video is well worth a watch as V-Ray also has a Triplanar Map.
https://youtu.be/7Fruh5i-Zp4


πŸ“… DATES

17th - 20th November Autodesk University 2020
Autodesk University is a must and this year it is online and free. Make sure to check out some of the sessions, including an industry talk by yours truly.
https://www.autodesk.com/autodesk-university/conference


30th November Chaos Groups Render Challenge Deadline
Chaos Groups student rendering challenge is on. For more information check out the link and make sure to submit your work before the deadline to be in for a chance to win some awesome prizes.
https://www.chaosgroup.com/illumination


πŸ“° ET CETERA

Join The Group
The work being posted in the Facebook group is getting better and better. Feel free to join the group and post your work. You can also post any CGI related questions here.
https://www.facebook.com/groups/luxuryvisualsacademy

Render On!

Render On Jake.jpg

Create a V-Ray IPR Keyboard Shortcut for Quicker Rendering

Saimah got in touch and asked if there was a quicker way to start the V-Ray Interactive Production Rendering (IPR). He said he found going through the Render Settings, and from the frame buffer time-consuming.

Is there a way to create a shortcut?

2020-07-14 10_18_41-Online Courses - Anytime, Anywhere _ Udemy.png

The answer is yes we can make a keyboard shortcut and this is probably the quickest way to run an interactive render.

2020-07-20 14_32_02-Window.png

Before I show you that, I just want to make you aware of the IPR button in the V-Ray toolbar. If you click and hold on render you will see a dropdown with V-Ray IPR on.


2020-07-20 14_35_36-Window.png

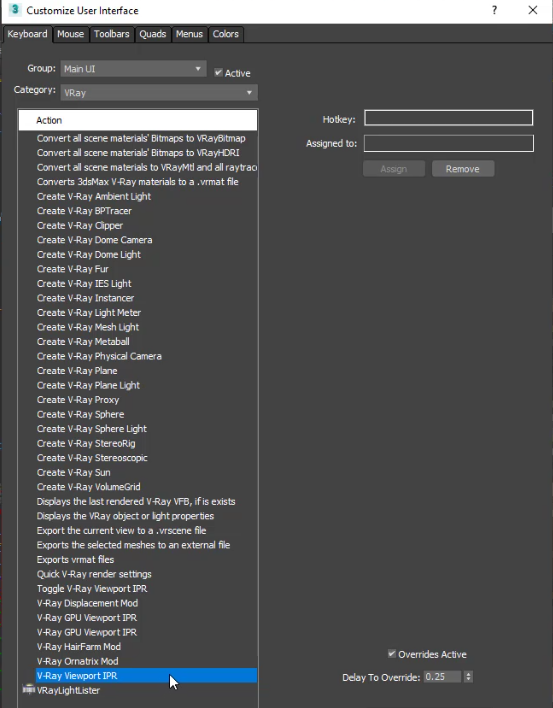
I looked in the Customise UI under the V-Ray Keyboard shortcuts and could not see a β€˜Run Interactive’ shortcut in here. We do have the option for IPR in the viewport but I prefer rendering in the frame buffer.

2020-07-20 15_01_10-Window.png

So let’s use a script. To start a V-Ray IPR render using scripts we can type vrayStartIPR() in the MaxScript Mini Listener (in the bottom left of the screen). So typing vrayStartIPR() and hitting enter will start the V-Ray Interactive render we want. But we don’t want to type or copy and paste this every time. So let’s create a keyboard shortcut for that.

Create a Script

Go to Scripting > New Script.

2020-07-20 14_42_46-Window.png
  1. We want this to be a macro script so type macroscript.

  2. Then type the name of your script, I called it VRayIPR.

  3. Next, write category: this is going to help us find our script from the Customise UI menu. I will call mine β€œLuxury Visuals”

  4. And finally, add vrayStartIPR()

So all together it should look something like this…

macroscript VrayIPR category: "Luxury Visuals" 
(vrayStartIPR())

Now save this. I just saved it to the desktop. Then I dragged and dropped it into the viewport.

Assign a Shortcut

Go to Customize > Customize UI and under keyboard find the Luxury Visuals category from the dropdown. Click on VrayIPR, in the hotkey assign your keyboard shortcut. I used Ctrl+\ and hit assign.

Now that’s assigned, when you hit Ctrl+\ you will start a V-Ray Interactive Production Render.

This is how I would tackle the problem, if you know an easier way I would love to hear it. There is a video of this process below. If you enjoyed using scripts to speed up your 3d work then check out how to make a copy and paste script video.


Get my BEST updates delivered to your inbox. Join my email list and get my favorite content regularly. Unsubscribe anytime.


Render On!

Render On Jake.jpg


β˜• CGI News - Luxury Visuals (September) πŸ“°

πŸ”¨ TOOLS

Autodesk releases 3ds Max 2021.2
A huge update for 3ds Max users. The smart extrude is a massive addition and will change the way we model. Other updates include, spline chamfer, bake to texture and UI and selection improvements. 
https://makeanything.autodesk.com/3dsmax

Corona Renderer 6 for 3ds Max Released
Corona Renderer 6 for 3ds Max is focused on attaining greater realism and speeding up your workflow. Some highlights include a new sky model, randomized tiling, new lens effects and 78 new materials.  
https://blog.corona-renderer.com/corona-renderer-6-for-3ds-max-released

❎ AWARDS

CGI Finalist International Design Awards 2020 
Last year I worked with SHH Architects on a project in Paris called Latitude La DΓ©fense. The visuals are now finalists in the SBID International Design Awards CGI category. You can see the work in the link and also give it a vote if you like them :)
https://www.internationaldesignexcellenceawards.com/finalist/latitude-la-defense/

Illumination Student Rendering Challenge
Chaos Group is hosting a rendering challenge for high school or university students. The theme of the challenge is light. The deadline is November 30th.
https://www.chaosgroup.com/illumination


Get my BEST updates delivered to your inbox.

Learn CGI from the experts with simple workflows, tools, and tutorials.

πŸ“Ί WATCH

Distress Furniture Edges in 3ds Max
In this video I show one of the best methods I have found to distress furniture edges in 3ds Max.
https://www.youtube.com/watch?v=gV2a7EkHD98

Add Stickers to Glass in 3ds Max | V-Ray Blend Material
Easily add stickers to glass using the V-Ray Blend material. 
https://youtu.be/tDALWFGATj8

πŸ“… EVENTS

Adobe MAXβ€”The Creativity Conference
Adobe will host Adobe MAX on October 20-22. A uniquely immersive and engaging digital experience. It will be 3 days of speakers, celebrity appearances, art projects, and 350+ sessions β€” and all at no cost.
max.adobe.com

πŸ“– READ

3ds Max and Corona Renderer: 5 Tips To Create Your Best Visual Ever
5 tips that will save you buckets of time when using Corona for 3ds Max
https://www.luxuryvisuals.com/jaked3d/corona-renderer-top-5

Render On!

Render On Jake.jpg

ο»Ώ

Modelling CGI Assets in 3Ds Max : 5 Tips To Create Your Best 3D Models Ever

Quick Summary

Here is a quick summary of what my blog post will cover so you can decide if this article is for you.

These are the tips in no particular order.

  1. Shapes From Lines. Extract edges from a mesh to create complex seams.

  2. Wire Volume Box. The best way to model to scale.

  3. Add Noise To Everything. Nothing is really flat, so it shouldn’t be in CGI.

  4. Drop Cushions. Use the cloth modifier to drop soft objects.

  5. Create Easy Rotations. Use Select and Link for hinges.

Do you want step-by-step instructions to implement all these tips? 

Alright, but before that let’s see what 3D Modelling is, here is a video from the 3D Modelling Course.

ο»ΏThe Tools


The tips I am going to show you are from the 3D Modelling with 3ds Max course, but don't worry about that just yet, check out the tips and see if you like them, because if you don't like them then the course definitely won't be for you ..

These are a few of the things I personally do to speed up my 3D modelling and add that extra level of realism.

After you're done reading and watching, you'll have new techniques to use when creating 3D models. My objective is to provide you with techniques so that you can start replicating the results in your own models for your own work.

The tips I am going to share are going to save you buckets of time in the long run and improve your models, so invest in yourself now and learn these techniques. I'll now go into details of my favourite tips using 3ds Max. Apply whats good and ditch what's not.

If you have not got 3ds Max installed you can find the trial version here (3ds Max)  


1. Shapes From Lines

How to extract edges from a mesh to create complex seams. To add seams to a pillow is rather simple when you know what you are doing. It looks great and adds that extra level of realism to your 3D model. 

Once you have your pillow modelled, using cloth and noise to give that killer finishing touch, grab the edge loop.


To Select an Edge Loop

  1. double click the edge.

  2. or click Loop under Selection in the edit poly.

Loop Select.gif

With our edge selected click Create Shape.

2020-08-18 16_25_21-Sofa Scene.max - Autodesk 3ds Max 2020.png

Your edges now become a new object. (the pivot will stay relative to the original object so a quick, Hierarchy> Affect Pivot Only and Center to Object would not go a miss.

2020-08-18 16_26_43-Fitbit.png

Now we have our edge all we need to do is add thickness by enabling Render in Viewport and Render.

2020-08-18 16_28_25-Sofa Scene.max - Autodesk 3ds Max 2020.png

We can choose from Radial or Rectangular and select the thickness. 

Here’s a video of it in action from the course.


2. Wire Volume Box


When I started 3D, one of the hardest things for me to grasp was the idea of building in three dimensions. I remember on my first day at University being told to model a car from blueprints. I was stumped, I couldn’t understand the idea of modelling in 3D space.

To ease this I started to create and use β€˜volume boxes’ to get a better understanding of the scale and how an object would sit in 3D space. This helped me tremendously compared to using just blueprints alone.

It’s really easy to set up a volume box, and when you add a wire material rather than just making it See-Through in the object properties. It is much less intrusive. 

Let’s take a look at how we can create a volume box as reference to help us with modelling in 3D.

  1. The first thing you are going to need are dimensions for your object. In this example, we can see the dimensions on the manufactures website.

2020-08-19 12_34_42-003_01 Rough Reference Box.mp4 - VLC media player.png

2. The next step is the create a box the height, width and depth of our object. So now we can see the overall size of our sofa.

2020-08-19 12_36_54-003_01 Rough Reference Box.mp4 - VLC media player.png

3. We can add in the armrest height, seat height and the legs as edges on our box.

2020-08-19 12_39_58-003_02 Reference Images.mp4 - VLC media player.png

4. Add a Standard Material to the box and enable Wire. Change the opacity to 0 to hide the triangles that are shown and now you should only see the wireframe in your viewport.

2020-08-19 12_44_13-004_01 Creating the Base Part 1.mp4 - VLC media player.png

5. Finally, turn off β€˜Show Frozen in Grey’ in the Display Properties and freeze our box so it doesn’t get in the way.

2020-08-19 12_47_52-004_01 Creating the Base Part 1.mp4 - VLC media player.png

Here’s a video that might help,


3. Add Noise To Everything

Nothing in real life is actually flat, so it shouldn’t be flat in CGI. When you see light bouncing off of a surface it is never going to bounce perfectly. This is the number one give away that an image is computer generated. It looks too perfect. The edges are too sharp or everything is perfectly flat.

I would suggest adding noise to a model using the noise modifier. Adding a noise map to the bump is cool, but for me subdividing the mesh and adding a noise modifier is the way forward. Here’s a quick demo of what I mean.

4. Drop Cushions 

I struggled with this for ages. If you want to make cushions and make them look realistic then you need to be using the cloth modifier. 

  • Your model can be pretty basic.

2020-08-21 11_53_48-004_05 Cloth Modifier Cushions.mp4 - VLC media player.png
  • Add the cloth modifier you can drop your cushion model onto a collision object. In this case the sofa.

2020-08-21 11_54_25-004_05 Cloth Modifier Cushions.mp4 - VLC media player.png

Here is a full video on how it’s done.


5. Create Easy Rotation Points with Select and Link


Pivot points and rotations can start getting messy. Especially when you want to start rotating something like this lamp.

2020-06-22 14_14_23-Window.png


Luckily we can use Select and Link to define the relationship between two objects by linking them as child and parent.

2020-08-21 13_35_08-Select and Link.mp4 - VLC media player.png

Have a watch of the video below to see what I mean…


If you enjoyed this article you can get my BEST updates delivered to your inbox. Join my email list and get my favourite content regularly. Unsubscribe anytime.

Your Next Steps ..

I hope you enjoyed this article and learned a thing or two .. :-)

If you feel like upgrading your β€œskills” you can check out the full 3D Modelling Course.

If not, I hope you have enjoyed the article. I would love to hear your modelling tips and if you have any suggestions for new articles, please put them in the comments below.


Render On!

Render On Jake.jpg

ο»Ώ

β˜• CGI News - Luxury Visuals (August) πŸ“°

πŸ“– READ

Modelling CGI Assets in 3ds Max
A brand new article on things to speed up 3D modelling and add that extra level of realism.
https://www.luxuryvisuals.com/jaked3d/3d-modelling

πŸ”¨ TOOLS

PolyCloth Plugin | Cloth brushes for 3dsMax
PolyCloth’s release coincides with the 3d modelling series. Check out the video below. I am really looking forward to using PolyCloth.
https://www.youtube.com/watch?v=7kszzf46lIU&feature=emb_logo

Corona 6
Corona 6 for 3ds Max is nearly ready and should be released in the next few weeks. Now might be a good time to refresh yourself with Corona Render Engine.
https://www.luxuryvisuals.com/jaked3d/corona-renderer-top-5

πŸ“Ί WATCH

Dropping Pillows
Here is a demonstration on adding pillows to a sofa using gravity and cloth in 3ds Max.
https://youtu.be/pYPpE4Qh-8c

πŸ“… EVENTS

24 Hours of Chaos
24 Hours of Chaos is a series of 10 back-to-back livestream sessions put together by Chaos Group. More information below.
https://www.chaosgroup.com/24-hours-chaos

Autodesk Vision Series
The Vision Series from Autodesk promises 3 days of virtual presentations and panels on the future of the industry straight from the minds of Autodesk thought leaders and customers. You can register using the link below.
https://makeanything.autodesk.com/events/vision-series-2020

Digital Content Creation on AWS
I have been following the world of cloud/remote work with great interest and I am enjoying seeing how artists and studios are adapting to remote work via the cloud. Amazon has a webinar coming up about this, β€˜Learn how creative studios can take advantage of the cloud to help with remote work, scale production pipelines and increase artist productivity..’https://pages.awscloud.com/GLOBAL-OE-Digital-Content-Creation-on-AWS-2020-reg-event.html

Render On!

Render On Jake.jpg

August's CGI News

πŸ›  TOOLS

3ds Max Indie License
3ds Max Indie is now available in a lot more countries, check here to see if yours is on the list. The 3ds Max Indie license is $250 (or equivalent), it has no limitations and to qualify your gross revenue needs to be under $100,000 per year.
https://makeanything.autodesk.com/3dsmax-indie

πŸ“Ί WATCH

3ds Max Webinar
Just in case you missed the webinar from the 3ds Max team, as well as special guests K6 Media Group and Hoare Lea. Here is the link.
https://autodesk.wistia.com/medias/cz12or26yw


Use the Cloth Modifier to Create Pillows in 3ds Max
Here is a video to demonstrate how to add pillows to a sofa so they sit naturally. Using gravity and cloth we can easily have cushions that sit nicely on a sofa in 3ds Max.
https://youtu.be/pYPpE4Qh-8c


Project Lavina
Project Lavina lets you explore your 3D scenes in real-time, in a 100% raytraced environment. Chaos Group hosted a webinar to demonstrate Project Lavina. More info and webinar link below.
https://www.chaosgroup.com/lavina
https://www.youtube.com/watch?v=Bd7aSS0EkQM&

πŸ“… DATES

Autodesk University - November 17th - 20th
Autodesk University is on between November 17th and the 20th this year and I will be presenting an Industry Talk called Using 3ds Max with Photography To Hit Deadlines for Advertising Campaigns. Thank you if you voted for my talk.
autodesk.com/autodesk-university/

Autodesk Portfolio Review - August 25th
In their webinar, Autodesk mentioned 20-minute sessions available with industry experts to review portfolios. This is on August 25th. There isn't a solid link yet, but keep an eye on the website below.
area.autodesk.com

πŸ“° ET CETERA

CamTrackAR - FREE 3D tracking video capture for iOS
Unreal Spotlight by The Mill

Render On!

Render On Jake.jpg

ο»Ώ

Where has the VRayHDRI Map gone?

The V-Ray 5 release has come with some fantastic updates. It has also come with some less publicised updates. Leaving some users wondering where the VRayHDRI map has gone, and if it is gone, what map do I use to load a HDRI into V-Ray?

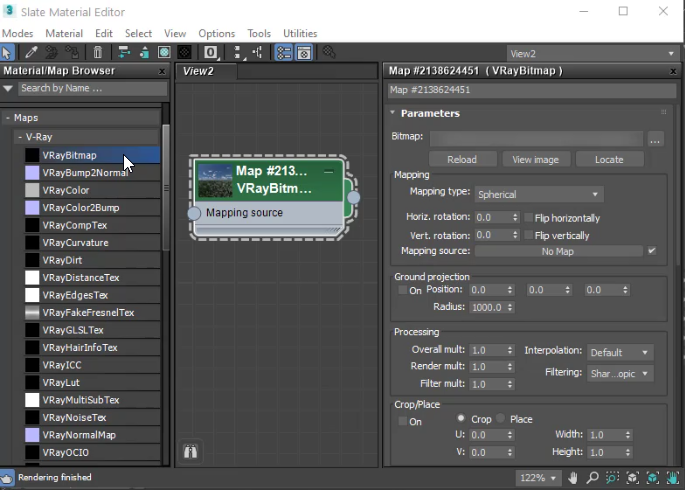
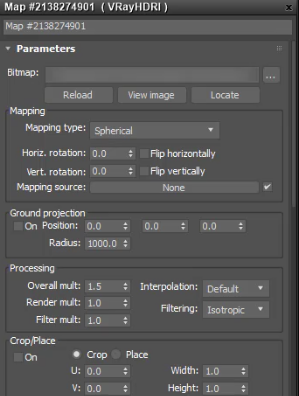
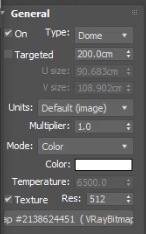
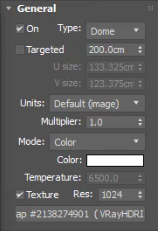
In short, the VRayHDRI has been renamed VRayBitmap in V-Ray 5. In older versions of V-Ray we would add a VrayHDRI map from the Material Browser and plug it into our Dome Light.

Versions previous to V-Ray 5 had a VRayHDRI map

Versions previous to V-Ray 5 had a VRayHDRI map

Now in V-Ray 5 we can use a VRayBitmap instead and plug it into our Dome Light.

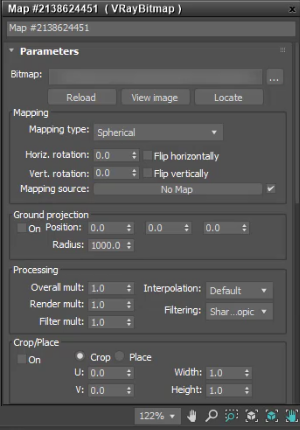
The VRayBitmap has replaced the VRayHDRI map

The VRayBitmap has replaced the VRayHDRI map

You can see the Parameters are pretty much the same and just the name has changed.

If you open an old scene in V-Ray 5 you will notice that it will automatically update to a V-Ray Bitmap.


Get my BEST updates delivered to your inbox. Join my email list and get my favorite content regularly. Unsubscribe anytime.

Render On Jake.jpg

V-Ray 5 Review : Beyond Rendering

V-Ray 5

A key theme in the V-Ray 5 release is simplicity, it feels easier to use and there are time-saving things that over the years you have just come to accept as a tough but essential part of using a render engine. I think we can thank Corona render engine for that. You can definitely notice the Corona, V-Ray collaboration and the sharing of tools, which is of massive benefit to both Corona and V-Ray users.

V-Ray 5 comes with a brand new, completely rebuilt frame buffer that is a joy to work with. Light Mix and Layer Compositing are the heroes in this release but there is plenty more cool stuff in this release so lets get to it.

Light Mix

Those that have used Corona render engine will be familiar with Light Mix. For many it was a driving force to add Corona to their tool set. Light Mix lets you create tons of lighting scenarios from a single render. You render your scene once and don’t really have to think too hard about the lighting before you hit render. Just place your lights and tweak them after you have rendered.

You can also create some nice light animations from one render. Imagine the time it would take to render all of the frames below individually.

ContactSheet-001.jpg

From a single render, you can create very different moods using the light colors, change a scene from day to night and turn on and off certain lights.

Light Mix Gif.gif

To set up light mix

  1. Add a light mix render element,

  2. Render your scene.

  3. Play with your lights in the frame buffer. (go to source and select light mix)

    Remember the light values are multipliers or the original light value.

V-Ray Frame Buffer

  1. A small but powerful addition to the frame buffer is the ability to search in the history panel.

  2. You’ll notice pixel information is down on the bottom panel rather than having to right click.

  3. And when you zoom you will notice a red border, which suggests you are not seeing the whole image. Again not massive, but it shows the thought that has gone into this release. 

  4. Render region is now much more intuitive to use, with the ability to move and resize regions.

Frame Buffer.png

Filmic Tonemaps

Filmic tonemaps have been added as a layer and are wonderful! V-Ray 5 comes with Filmic tonemaps built in and some of these have the option to edit them further. These tone maps are definitely going to get a lot of use going forward. AMPAS looks great out the box and then Power Curve has tons of options we can play with.

FilmicTM.gif

Material Manager

I find the 3ds Max way of handling material libraries tough and loved what Corona did with theirs. V-Ray has done something similar and with the addition of being able to save and organise your own materials coming in the next hotfix this is shaping up to be a great material manager.

Material Manager.png

Something else that you will notice is the material previews have been greatly improved with an updated light setup. These material previews are much closer to what we will see in the final render.

Material Presets

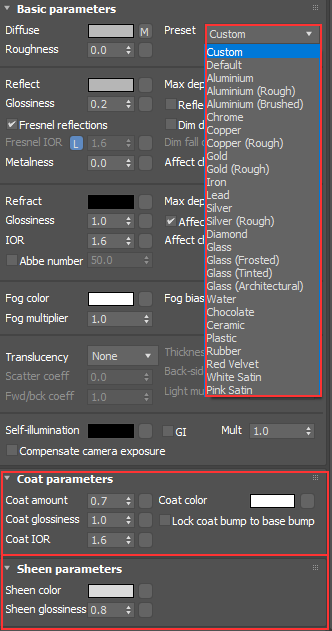
V-Ray ships with over 500 ready made materials, these will give you a massive head start in your material creation. The V-Ray materials also have the addition of presets. So for any of you fed-up of having to search for the index of refraction of a material, this is a great addition. The new coat layer option in the V-Ray material does away with needing to add a blend layer to get a varnished finish on your materials and the sheen option aids with the creation of falloffs for fabrics.

Vray Mat.png

Textures

VrayUVRandomizer has been added. When plugged into a Vray Bitmap we can control multiple UVs, another example of improving things you had come to accept.

Multi UV.png


There is also an option in here for Stochastic tiling. Even if your texture is seamless you may get repeats and with this turned on we can see it randomizes the tiling.

Stocastic Tiling.gif


VrayMultisubtex is a new addition as well. Anyone familiar with CG Sources MultiTexture will understand the power of this map. You can have random by element on and change the hue, saturation and gamma to quickly get a decent amount of variation from just a few textures.

MultiSub.png

I would love a way to drag and drop textures in as Vray Bitmaps rather than the default bitmaps. Also worth noting is that the VrayHDRI map is now VRayBitmap and you can plug your HDR images in here. 

Conclusion

This is one of the first render engine releases I have been excited about for more than the promise of speed improvements. We have been given a fantastic tool set where the pendulum has shifted from technical knowledge to creative flexibility. We are artists that want to create art and Chaos Group have offered us the ultimate Swiss army knife. 

Get a 30 day trial here - https://www.chaosgroup.com/trial/vray-3ds-max

Full Video Review

Get my BEST updates delivered to your inbox. Join my email list and get my favorite content regularly. Unsubscribe anytime.


I hope you have enjoyed the article. If you have any suggestions for new articles please vote here

Render On!

Render On Jake.jpg

Product Rendering: 3 Reasons Why Its Time To Use CGI For Your Product Images

CGI stands for Computer Generated Imagery. It is the creation of visual content using computer software. Technological advancements mean it is possible to create images that are indistinguishable from photographs. CGI is virtual photography and used more than ever, the last advert you saw is most likely created using CGI. The benefits are cost, time, and quality.


CGI is not only reserved for blockbuster movies. Did you know that 75% of the Ikea catalog is CGI? Furniture manufactures and online sellers realise the importance of product images. It is the first thing customers look at and will be one of the most important factors in the product’s success.

Which one of these would you buy?

Image Credit: sumo.com

Image Credit: sumo.com

Take a look at your competitors and even your site. I imagine most images are photographs on a white background. Having clean product images with no distractions is important. Your website is where your customers are most likely to buy. The best way to showcase your product is with these crisp images.


Cost

Transporting products and staff costs money and can be a logistical nightmare. As well as renting a photography studio, equipment, and a photographer. Products that come in different materials and configurations add to the shipping costs. Not only a monetary cost, but shipping products has an environmental impact. This environmental impact is avoided with CGI.

CGI gives the opportunity to see and sell the product before it even goes into production. Seeing the product pre-production saves much wasted time and resources. With CGI the only cost is the CGI itself.


Time

If you need different variations of a product then photography would seem archaic compared to the speed of CGI. Time, traveling and shipping products to the shoot on top of the time it takes to do the actual photoshoot soon snowballs. CGI is faster than doing a traditional photoshoot because there is no need for a photoshoot at all.

There is also no room for error with a traditional photoshoot as you only get one chance to do the shoot. With CGI it is possible to make changes all the way up to the publication of the images. CGI lets you alter product images without needing to reshoot.

Once the CGI version of the product has been made it can be used over and over for future product images. And finally, with CGI, marketing material can be distributed before the product even exists.


Quality 

With CGI materials can easily be exaggerated to show off a β€˜better than real-life’ quality. No need for retouching photos after the shoot.

DenhamIO_GIF.gif

If you have ever tried to line up photos to flick from material to material you will know it is almost impossible. Above you will see the smooth transition between images when using CGI. With CGI you get exactly the same image in different variations.

Conclusion 

From being around traditional photoshoots I am a massive advocate of CGI. I honestly believe that CGI is a more cost-effective and smarter way to work. 

I hope I have helped to highlight some of the key reasons why I believe you should be investigating CGI for your product images. β€‹β€‹β€‹β€‹β€‹β€‹β€‹

If you have would like to talk about getting your product images created, send me a message on denham.io


Rendering CGI Interiors: 5 Interior Tips To Create Your Best Visuals Ever

Quick Summary

Here is a quick summary of what my blog post will cover so you can decide if this article is for you.

These are the tips in no particular order.

  1. Speed up your workflow with scripts. Let the robots do the work.

  2. Use fur to soften up your scenes. Use organic objects to add realism to your CGI.

  3. Soften your edges, easily. How to use maps rather than chamfer.

  4. Depth of Field. Add realism to your shots with DOF.

  5. The future of rendering. Fast, efficient and cost-effective. This changed everything for me.

Do you want step-by-step instructions to implement all these tips?

Alright, let's get going.

The Tools

The tips I am going to show you are from the Interior Visualisation with 3ds Max and V-Ray course, but don't worry about that just yet, check out the tips and see if you like them, because if you don't like them then the course definitely won't be for you ..

These are a few of the things I personally do to speed up my workflow and deliver high-quality images to my clients.

After you're done reading and watching, you'll have new techniques to use when creating 3D renders. My objective is to provide you with techniques so that you can start replicating the results in your own images for your own clients.

Top 5 Image 1.jpg


The tips I am going to share are going to save you buckets of time in the long run and improve your rendering, so invest in yourself now and learn these techniques. I'll now go into details of my favorite tips using 3ds Max + V-Ray and show you how you can do the same in your own 3D renderings.

But first, if you have not got 3ds Max and V-Ray installed you can find trial versions here (3ds Max + V-Ray) You don’t have to use these tools specifically. Have a read and apply whats good and ditch what's not.


1. Make Quick Scripts

Scripting, coding, whatever you call it is reserved for developers, not artists, right?

Wrong, one of the best things I have done in my work is to see what scripts are all about.

The best artists in the world recommend them. 20 Top Tips From The World’s Best 3D Artists.

Have you ever thought, I do this task over and over again, there must be a quicker way? Well, you’re right there is.

I made a copy and paste script and I worked out it made me about 83% quicker in that specific task.

My Maths

My Maths

You can download the script from the resources of the course, but you should create it yourself so you know what your doing, β€˜give a man a fish, give a man a fishing rod…’

So here is how I did it…

Open MAXScript Listener from the Main Toolbar. Scripting > MAXScript Listener

This is going to open up the Max Script Listener window.

Max Script.jpg

In here you will see MacroRecorder, click this and Enable

I think this is one of the coolest things in 3ds Max, it basically shows you what’s going on behind the scenes.

Go ahead and create a box one and watch what happens in the Listener. If you want to create a box in the future then you can just copy and paste this script.

I know you know how to make a box using Create > Standard Primitives > Box and click and drag. But if you think about that, you’ve done 3-4 clicks.

If you make a button for your script it will be 1 click. Making this action 3-4 times quicker next time. Compound this and the effects are massive.

Obviously this is a very basic example, but some good uses for small scale scripts are

  • Add a 100cm x 100cm, Box, UVW map. (5 clicks become 1)

  • Reset X-Form and ground pivot points. (6 clicks become 1)

  • Add a Real-World UVW box map + Chamfer (5 clicks become 1)

  • Create a new basic material and apply to the selected object (7 clicks become 1)

As a general rule, if you find you have done a task 5 or more times in your life it’s time to consider if you should make a script for that action.

Here is a video showing how to make the copy and paste script.


2. Use Vray Fur

3D is made up of polygons, basically squares. Squares have straight edges, which means in previous years it was tough to make β€˜organic’ objects. Things such as plants, fabric and soft, curvy things were hard to make look realistic because of poly count restrictions.

Check out the poly counts from Crash Bandicoot on the Playstation 1

Check out the poly counts from Crash Bandicoot on the Playstation 1

Compare the Playstation version of Crash Bandicoot to what Epic just tech demoed in Unreal.

All the polys

All the polys

Now we are practically unrestrained by poly counts there is no reason not to be β€˜softening’ up your scenes with organic objects.

I would suggest

  • Flowers and plants

  • Fabrics, cushions, and throws

  • Fur and hair.

Fur, in particular, is something people are not so used to seeing in CGI so you can expect to hear more β€˜what that’s not a photo?’ 

Here’s a quick video showing how easy it is to start creating awesome fur.


ο»Ώ

3. Soften Edges With Maps

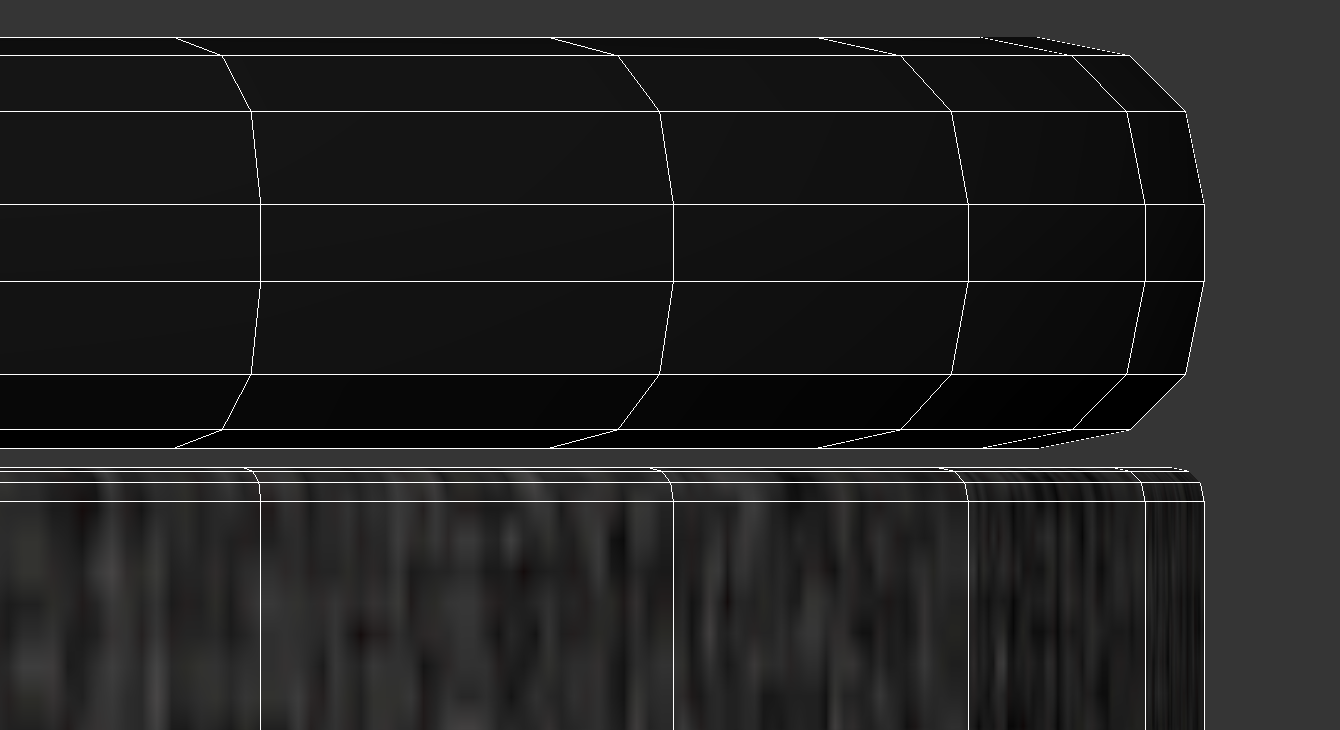
Talking of softening edges, chamfer has always been the go-to when trying to soften up those hard CG edges 

Chamfer.png

Especially with Autodesk’s work over recent versions of 3ds Max on the Chamfer modifier. Which, with all jokes aside is so much better to use than within the editable poly. The modifier allows us to stack the Chamfer to update later on, rather than β€˜baking’ it into the editable poly.

But…

There is an easier way. And that way is by using the Vray Edge Tex map. You can plug this map into the bump slot and it will β€˜chamfer’ your edges. You can keep your current bump map as well by using a Vray Comp Texture.

Check out the video below on how to use the Vray Edge Tex Map to create soft edges.


4. Depth Of Field

Depth Of Field (DOF) can add so much to an image, I particularly like using depth of field on detail shots like below. 

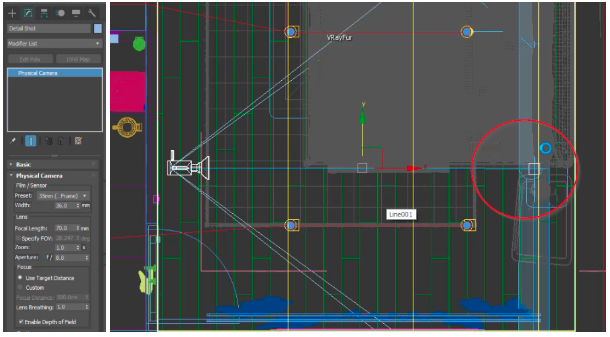
This is achieved pretty quickly by enabling Depth Of Field in the Physical camera and turning on Use Target Distance. Then all you need to do is place your camera target to where you’d like your image to be in focus. 

3ds Max Physical Camera and Camera Target in Viewport

3ds Max Physical Camera and Camera Target in Viewport

Here is a video of how I achieved the depth of field in the image above.


5. V-Ray Cloud

This changed everything for me. Since I went freelance and started traveling with my laptop render power has always been an issue for me. I have tried many render farms, but V-Ray Cloud is my new favorite.

I have found the upload speeds are second to none, I think this is because they use a VRScene file to upload it. I don’t know too much about the technical stuff involved here, what I do know is it works.

Here is how to install V-Ray Cloud and how to submit a render.


Your Next Steps ..

I hope you enjoyed this article and learned a thing or two .. :-)

If you feel like upgrading your β€œskills” you can check out the full V-Ray Interior Course.

If not, I hope you have enjoyed the article. If you have any suggestions for new articles, please put them in the comments below.

Render On!

Render On Jake.jpg

ο»Ώ